1972 GS Convertible Final Assembly
Stay Tuned......
Dec 19/2005
Front and rear bumpers chromed. Front looks nice but rear bumper has some chrome issues so it will be going back. Buick used chrome to shape the front and back of the cars, these things are massive!! Heavy too, the front one weighs 29 pounds and the rear weighs 39 pounds BARE!!! No brackets, clips or anything. On a 3800 pound car that means the bare bumpers account for 1.8% of the total weight. Wow!

Some of my stainless trim has been dropped off at local shop to be polished as well. I can do smaller stuff myself but some trim had issues and I don't want to deal with it. Plus it makes a big mess in the garage which will have two cars in it shortly. It also helps the timeline.
Dec 20/05
Its kind of funny, this car has been hanging around for so long and sometimes the progress seemed to take an eternity, now all of a sudden its all coming together and I am un-prepared! Go figure. Some items are kind of surprising, my NOS "Buick Motor Division" fender emblems had to be stripped of the paint as it was full of crap and a really dark ugly red..right from GM.

I laid them out on my vise (don't clamp them in!) and used my wife's fingernail polish remover and a bristle brush top clean out the original paint. Once the worst was gone I used a toothbrush for the final little bits. Turned out some of the crap was actually casting or perhaps chrome issues. Those bits were carefully scraped out with a razor blade, outside edges were masked with tape and then the new paint was sprayed on.

The only tricky part is every time you spray a coat of paint in there, you have to take a lint free cloth, wet it with the polish remover, and use the tip of your fingernail to wipe the tops of the letters off. I have heard you can scrap it off later but I prefer this way. Sorry no pics, I was a little busy! Having the emblems on a box with the studs punched through holds it all steady while you do this. One pass, then use new section of the cloth or the paint builds up fast. Each emblem took about 6 passes to clean the letters off. I used engine paint, it certainly can't stick any worse than the factory stuff. I even baked them at 180 degrees to cure the paint. Please note the factory chrome roughness, also they look a bit blurry due to re-sizing to save space. MUCH better!!

I have a set of original 455 emblems and I debated putting them on the car. It will be 455 powered after all but I decided to go with the original ones for several reasons. First one being the only external ID on a real 455 GS is the fender emblems and I do not want to misrepresent the car. You could argue that it is 455 powered, but none the less it is a small block car and I see no reason to mislead anyone. There are enough fakes out there already, no point clouding the issue. There will always be someone too who points it out at the show just before he gets in his rusted out jetta and heads home (like you couldn't tell, the engine code is in the VIN!!)... the other reason is I like un-assuming cars that pack some heat. You can always tell people its a 350 and most won't know the difference anyway.
No, I didn't weigh the emblems.
I do everything the hard way it seems. The best set of taillight lenses I had were the 72 Skylark custom style which actually had the silver outer edges. All other cars including the GS had the blacked out edges. What's the big deal? The silver edged lenses also had the raised molding lines in the center painted on (the black edged ones did not, they were left in the molded plastic red), so I had to spend HOURS carefully scraping the paint off with a razor blade, then more time polishing the lines with heavy scratch remover so they were smooth and free of all paint. There was lots of overspray in the middle too. This picture shows the lenses as they are now (sorry, no before pics-stupid!), next step will be a fine polish by hand to get rid of any polishing marks. Then paint the black edges and good to go. Something like 4 hours per lens at this point.
The best part?? I bought a set of NOS 72 lenses on e-bay and decided not to use them as these ones turned out so nice. And the NOS lenses are also the silver style!!!LOL Now the parts place inc has reproduced the 72 lenses too although from pics it looks like the reflective part is molded right in so they wouldn't be correct for the hardcore resto guys (factory is a separate piece glued in). Good to see some parts getting made though!

Dec 22/2005
In between the holidays and company, I did manage to sneak out to the garage a few times and carry on with the car. Taillights are now painted, worst part of that is the masking, it gets kinda ugly in the corners. I also left the tape along the top and bottom stuck to the raised lines but not the very edge so a very slight feathered edge is accomplished much like the factory stencils (which were also much sloppier overall). Still need to clean out some of the crevices and any extra overspray but they look pretty decent even with a close up and flash.

Next item is the actual housings. They were originally coated with plastic chrome inside and age really destroys them, much of it has peeled and crumbled. Getting them re-chromed would be ideal but I'm running out of time and its expensive, so what I will do is clean them up, sand and prep as required, then spray the inside part where the bulbs reside with that cheap bumper chrome spray paint (the one with the chrome cap that is quite shiny but doesn't look like chrome when sprayed!). I've done it before and it lasts forever so its not a bad way to go. On the 72's its important to make it look nice at least in the reverse lens area, as the clear section is large and you can see into the housing assembly.
I have an extra housing set and plan on sending it out for re-chroming at some point and will swap it out then. Meanwhile its important that the taillights look balanced, nothing says crappy better than taillights that are all different shades of brightness. I also plan on playing a bit with silver leaf and see how that may or may not work. There is also a chrome paint on the market now that actually looks like chrome, however I am not sure how it would hold up to any kind of heat, that might be worth a try as well.
Dec 28, 2005
Next on the list of things to finish is the top pump. The pump was tested, then taken apart and replated/painted as required. The motor side was ok, brushes still have lots of life left and things looked good. Biggest issue was the fire had melted the plastic connector and discolored the wires at that end. I had to trim off the last 2" of wire, install loom, crimp on new connectors and replace the plastic connector. The pump/reservoir itself looked good, other than the fluid being a hard goo from sitting so long after being cooked. The housing and bolt were replated, and I replaced all the seals/check balls/mounts/plugs with a kit from Convertible Service.

Jan 4/06
Car is being wetsanded in preparation for final polishing. Can't wait to see it with mega gloss!! Not much to note here except it is very labour intensive. The polishing is messy so the masking is left on where ever possible until time to do the final blending. The body lines are starting to come out and look really nice...

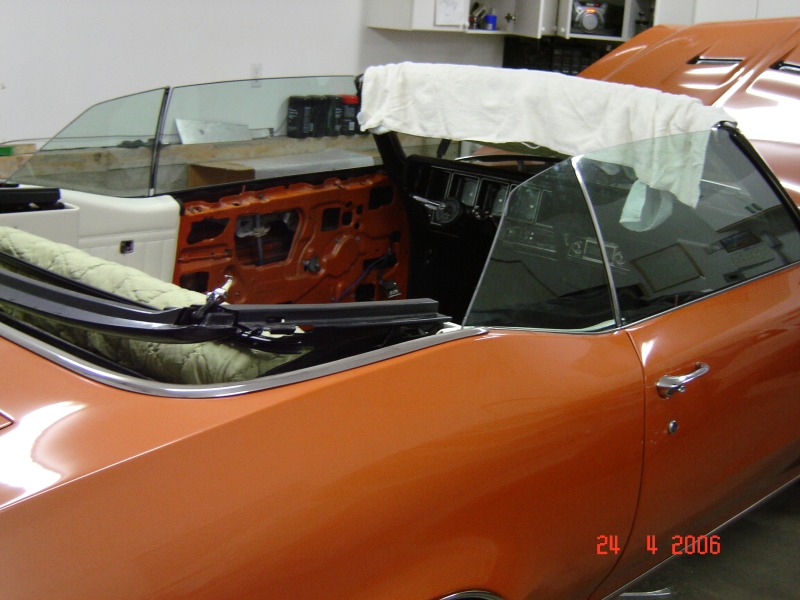
Windshield is installed as well. That was interesting as I finally got to see and help install an old car windshield with urethane. Originally these cars use butyl tape of course, which is pretty weak (15psi tension) and sloppy and tends to make a mess as the glass is always moving and settling over the years. Urethane was developed for strength (800psi or so) as windshields became larger and more structural (airbags require glass to stay in to work properly). Now I have seen exactly how its done with little tips and insights and I'll be doing my own from now on.
We used the stainless to set the height of the glass. A foam dam was built, the urethane applied around it, the glass was laid into place and then shimmed as needed to get it to the right level so the stainless sits nice. These old cars were pretty sloppily built and we did have to shim the top of the glass a bit. Normal stuff he said. After that sets up, he will check the seal and be adding more to make sure it is totally sealed.
I'm just glad the glass is no longer sitting in my crawlspace. Its been in there for over four years! Pic was taken after the side moldings were removed again.

One thing to watch out for here! I bought new GM clips (p/n 8717859 still available after all these years!!) * and discovered some had defects. There is a tab that gets rolled over, and this rolled edge is what your stainless slides over to clip it into place. If needed, these clips can be bent slightly with a tool to pop the stainless off again without damage. One several of my clips, this tab was NOT rolled over and stuck straight out. You would be able to clip the stainless on but I am sure you will never get it off again without damage. To my knowledge nobody makes repro stainless so it could be a world of hurt. The one on the left will be returned. The hardtop style probably has same issues so be careful!

It doesn't look too bad from that angle, but this pic should show how ugly it could get. Try sliding your stainless back up over that!!

Jan 11/2006
Update Jan 27/06 I have found these exact clips at my local NAPA (figures) right down to the same plating and same id stamped into them. They are cheaper than GM by about 30%. The p/n was Belkamp 655-1951. Might save ya a few bucks.
Some major progress today. Car is mostly polished in an effort to get it home so I can do some assembly while the rest of the parts are completed. Car was unmasked, front fenders removed, NOS emblems installed. Fenders and wheelhouses were installed and aligned but I currently have no pics of that.

While the fenders were off, I took the opportunity to install the new front emergency brake cable and get the wiring fuseblock/junction installed as access with fenders/wheelhouse installed is very tight.

The car looks excellent with one color on it. I still have trouble grasping it has finally reached this point. The repro quarter has turned out very nice, better than I thought it would. It looks correct, and has the proper contours to get the 'rolling" effect as the car goes by. The body lines on these cars are very subtle. I tried to take a pic to show this quarter but in the booth there is no room and unusual lighting, plus the color responds like mad to the flash so here is the best one I could manage for now. Gaps are pretty good so far, better than factory ever was. Final adjustments were made with the car back on its wheels after this pic was taken. Hood was test fit and removed again as it will be staying behind for a bit.

Jan 15, 2006
Car is home (mostly!). Hood will be along shortly, but for now there is so much to do. Saw the car in the sun today for the first time and the body lines really stand out. The color is bizarre, orange and rusty yet has gold highlights and changes constantly no matter where you look. The only real issue I have found so far is the drivers door gap at the aft edge is quite tight. It will have to be adjusted which means the fender will come off again. It stands out because all the other gaps are perfect. Too bad we didn't notice it before the fenders went on (that is what happens when you rush). It will affect the hood too but the adjustment is so small that it might actually help square up the whole front end.
As it sits tonight...Yes the hinges should be gray phosphate plated.

Jan 16, 2006
One of the many items that will be worked on today. Details count, nothing looks worse than scratched up glass or mirrors. Its also a safety hazard. Its never been easier as pre-cut mirror is available for the sport mirrors and they are cheap or you can have your local glass shop make them as well.
If you decide to do this yourself it is easy. GM simply used four dabs of silicone adhesive to hold the glass in. To get it out, you just smash the glass and then peel out whatever stays behind. If you try to pry it out you will wreck the edges of the plastic housing. Make sure to put a rag over the mirror before you hit it to prevent glass shards from flying around. You may wish to do this over your glass recycle bin. Also, note the passenger side you just hit it in the middle, but the drivers side with the interior adjustment knob you need to hit it off to one side as the plastic is molded for the adjusting cables and it will prevent the glass from breaking easily.
Make sure to use gloves and eye protection!!
Once you have cleaned all the glass out, clean or polish the plastic backing, then simply put four dabs of silicone down in the same areas as GM did, set your new mirror glass in and let it cure.

Jan 17, 2006
Door glass is in and rough adjusted. For now its enough to get it in the doors. Next is quarter glass, and once all that is in then the top will be put up and all the glass aligned. That will be after the drivers door gets adjusted again, no rush. That will also be after my new top parts show up. The weight of all the hardware has caused the drivers door to sag just a touch, even though weight was simulated when the empty doors were hung. The gap is a bit tight too so we'll get all that sorted out as well (its within the assembly manual limits but when you have one that is close to limits and all the others are bang on do the extra work and get it as good as you can...). Passenger door sits perfect with all the heavy stuff in.
The car has power windows so to install the glass I made up a small harness using an old p/w switch and the motor connector, that way I can run the windows up and down using my small battery charger as there is no electrical system installed yet (and I need a few items to get it in). Paper taped to windshield has notes and easily overlooked items that need to be done so nothing gets missed.
Door latches are brand new Goodmark pieces, and are very nice. Originally doors were painted with these in, but I elected to install them afterwards. It might not be totally original but looks a hell of a lot better, nice and clean. Also, be aware that these were designed for the door handle pushbuttons with the straight rod, mine had the bent rod style and they had to be changed to work properly. I was going to install brand new GM handles but after ordering 5 of one side and still getting bad quality chrome I decided just to use my original handles after polishing them up and save my money. Door locks are brand new GM, once again they are slightly different as they have no slot guide for the key like the originals. But mine were trashed. You can also get the new covers put on at your local dealership.

Jan 18, 2006
Today took the drivers fender off, then adjusted the door forward. This proved to be very frustrating until I discovered the upper hinge was at the lowest point possible in the floating retaining plate and captive assembly, thus it would not slide forward as bolts were hitting hinge plate cutout. I had to undo the door and body side bolts on that hinge, move the entire hinge up about 1/8" or so, this then allowed me to move the door forward the 1/16 that I wanted. Once that was done I had to set the angle on the hinges so the door didn't sag when opened. This takes two people so my wife helped me with that.
Fender is mounted again (by myself!) and looks good. The gap along the bottom of the door wasn't quite parallel so I dropped the forward edge of the door down when I was adjusting it. This also had the effect of giving me some more room between the stainless w/s trim and the door forward edge, and allowed me to tighten up the gap a tad on the fender without interference when opening. Its pretty tight, though. The hood had been test fit previously and was pretty good but with these adjustments I'm thinking it will be perfectly square. It should be done by end of the week and then we'll see for sure. No doubt there will be more tweaking.
Jan 24,2006
1/4 glass is installed, but not adjusted yet. It needs the door glass adjusted to set the 1/4 glass and the door glass needs the A-pillar weatherstripping and channel to be set and that goes on after the final install of the A-pillar stainless trim and that gets installed after the header vinyl is glued on. :-) Also needs the top to set the height so for now they sit as some top parts need to be replaced yet.
Top opening stainless trim installed. That part is under some tension so I put tape down around the opening to protect the paint. So far I have been lucky but you know its coming... 1/4 glass outer weatherstripping is also installed.
At this point, doubt I'm gonna make the show...so much to do and I keep running into little issues. Nothing serious but they do take time. And some parts for this car have not even arrived yet and show is in three weeks now....

Jan 25, 2006
On these cars Buick elected to go with vinyl on the windshield header rather than stainless or chrome like some other cars. This thing is right in your face, and also ugly to do. GM simply folded the vinyl over on the outboard edges and it doesn't look so great, even mostly hidden under the weatherstripping. I glued mine down in two steps, first being the middle out to about 4" from the ends. I let that dry and then worked the vinyl until I had figured out how to move the material so the only fold is hidden under the latch receptacles. Then I glued down the outer sections. Don't use too much contact cement where you start again or there will be a bulge. Make sure to wrap the leading edge over as far as you can go, and down behind the clips for good retention (although the stainless will help hold it in place).
Also installed a few seals, mirror bracket, sunvisor brackets, etc. It all takes time.

Jan 27, 2006
I also installed the header panels and rear view mirror today. Almost all GM verts of this vintage that I have seen have horrible fitting pass side latch receptacles, to the point that the header panel does not even go over the molded in recess, leaving an unsightly gap. I found that by putting small shims under the receptacle attach screws I could angle it slightly, making everything align better. Both sides are even now. The pass side header panel required a slight amount of trimming on the bottom edge to prevent it from chafing on the receptacle.
This car has the map light option. Only thing here to watch out for is the wiring that runs under the drivers header panel. I believe GM left it loose which will allow it to rattle and move around. They seemed to have been run roughly based on the ones I have seen, I even had to use shrink tubing on a couple spots where the wire had been pinched. I made a nice little loop up and to the back and ran it down the backside of the w/s header using foam tape to secure it. Make sure to leave some slack on both ends to allow for temp changes and mirror access. Details like this help make your car rattle free. I HATE rattles...

Header panels and rear view mirror installed. Nice visual progress. Note the weatherstrip channel is for test fitting only, as final ones are being polished. Dash main harness has been run and rough installed, power window forward harness has also been installed.

Jan 27, 2006 late
Lots of useless stuff today, like running around looking for parts. Prepped my kickpanels for dying (even though they are already black) and then discovered I was out of dye! Naturally this was after hours so I was SOL. I did get the vent knobs replaced though, which is a major detail that many overlook. They are cheap and easy to do.
Its pretty simple. All I did was put the arms in a vise, cut the knobs crosswise with a hacksaw and then use sidecutters to split them off. The plastic cuts easy, stop as soon as you feel a change. Peel the knob off, then the new on goes on with some epoxy and a slight tap with a small hammer (they are interference fit), using a rag or cloth to protect the chrome. I bought this set from NPD, they are for 68-72 Chevelles (same thing as our cars of course).

And here is the set once completed.

Also installed the body wiring harness, and some other small items. One thing that annoyed me was the rear power window harness, originally the harness was held in place with sheetmetal screws run through the FLOOR! Not a chance I'm gonna do that with my fresh sheetmetal so changed the runs somewhat. Might used double sided tape to hold those screw on clips. Wishing now I had built my relay setup for the top as time is getting short and now I have to make it up too.
Jan 28/2006
More details today. Made up courtesy light harness as could not locate a decent original. The interesting thing is the original wiring harness appears to be one piece which probably explains why everyone cuts the wires on the lower piston panels when they remove them. I made the harness from a hardtop original to get the correct color and thickness (it had an extra thick wire protective coating as its under the seat). I also added connectors at each side that would be easy to reach with the seat out in case I ever needed to pull those panels. Could save a lot of aggravation compared to the one piece harness. All connectors are original GM with new terminals B crimped and soldered on.
The routing of the harnesses has not been finalized yet.

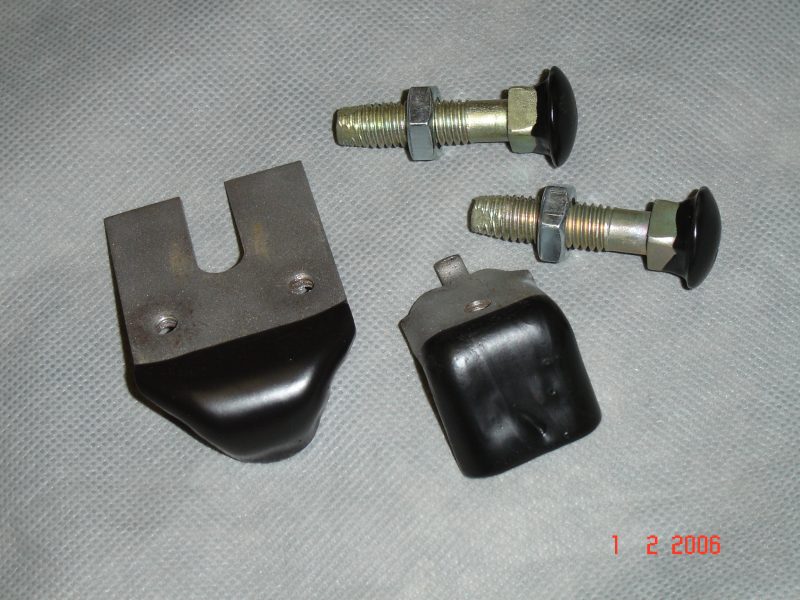
Details, details. Here are some parts that get overlooked all the time. The two brackets are the up stops for the 1/4 glass windows. They were beadblasted and then were dipped for a new rubber coating on the contact area (original rubber was peeled off). This will stop squeaks and rattles when the windows are up. They will also get treated for rust prevention but I wanted to make sure the dip coating had a good grip on the parts...you will not see these once installed.
You will see the hood bumpers though. These mount in the cowl area and are designed to hold the hood aft end in place in a front end collision (keeping the hood from coming through the windshield). They were beadblasted and replated gold zinc (all the originals were gold once I peeled off the rubber), then dipped to replace the rubber coating GM put on. New locknuts set them off.
The rubber coating was purchased at an industrial supplier. You can also find it in tool houses. Once set up it is incredibly tough and should be good for many, many years.
Feb 1, 2006
Discovered waterpump flange had a wobble while bolting on pulley. .010" runout at 1" from center is not good, odd part was shaft was ok. Returned for warranty (its never been used!) and installed new one after painting. I checked it first of course and had to touch up bolts too. This kind of thing is really aggravating and takes a lot of time. Wish you could buy new, these cores are getting tired after all the rebuilds it seems. Alt is mounted, engine wiring rough run, doorjamb switches in, steering column installed (it was rebuilt with new tilt sphere, bearings and seals) and adjusted and some final wiring completed under the dash.
I've decided there is no point rushing for a show so the 2006 World of Wheels is out. No way can I get the top done, finish the interior, get my top relay setup running, fire the engine etc in just two weeks (I have a real job too). I'm also running out of money.
Feb 3, 2006
Funny how things work out. May have found someone to install top. So the show could be on again. First I need to run the top with power and make sure its ok, not easy to do without electrical systems. So finishing that up. Also did a bit more with the engine, additional sealant on the windshield and added upper stainless trim. Damn it looks good!!! Note interior panels are just sitting there, thus the gaps. Also note how easy it is to use a ceiling mounted trouble light with a convertible!! :-)

Feb 4, 2006
Kickpanels are installed. They were black to start with but I dyed them to make the black a uniform color as they had faded in areas. When installing its important to get the sealant in correctly so you have no leakage into the cabin floor area. GM makes an extruded sealant in 1/4" diameter strips, and that is what I used (two rows around perimeter). You can test for leakage by pouring water in the forward cowl vent openings.
Also, the passenger side upper vent would not close all the way, so had to tweak the actuating arm slightly to get it to open and close completely. The lower cable was also tweaked slightly so there is 1/16" "bounce" when closing the vent. Too much and the knobs will stick out when closed, not enough and the vent doors won't close properly. Take your time and make small changes. I cleaned up the steel cable but you can see there is still some discoloration. Before the grilles go on all the cables will be lubed. Not sure how much the vents will matter in a convertible, but might as well make everything work as good as you can while its all exposed.

Feb 5, 2006
Discussed the rear bumper with the plating shop today. Basically it is the best they can do. All kinds of excuses. Typical, once they get your money they aren't interested in helping out anymore. Thats fine. I'll mount the bumper for now and will look for a core to get re-chromed somewhere else.
Tweaked passenger fender a bit. By shimming the bottom down I was able to smooth the surface match to the door. The peak line down the side is still really good. Amazing how much you can change the fender lines with a 1/16" shim! This won't affect the hood opening at all. Looking forward to finally seeing it with the hood on. Aligning sheetmetal is one of those jobs that looks really easy until you try it...it can be very frustrating...as one of my friends said "the art of compromise".
Tranny cooling lines are in, speedometer cable is in, some other little details.
Feb 7, 2006
Wheelwell moldings are installed. I burned myself on these. I decided to have them polished and there was a last minute change due to a nick I discovered in one of the four I was going to use. It was in a bad spot so I grabbed the next best one...problem was that this piece had not been test fit like the first four so when it went on it was kinda ugly...took some work to get it on and looking decent. You'd think all the holes would be in the identical position but it is not so!! Some of the trim holes had to be elongated slightly to get the best fit (factory fit was, as usual, all over the map).
Other three went on with no issues. It is starting to look like a car...rocker moldings, marker lights, fender/hood trim will pretty much do the exterior other than the very front.
Windshield lower trim is on. Looks good except windshield install was a bit sloppy and you can see some of the foam through the windshield. What can you do? It looked good to me too when it was laid out but its a touch high in spots. I'm kinda pissed at myself for that one but last time I put a w/s in was something like 1993 so I forgot how low the trim goes (and we didn't have one to test fit). Oh well. It will give everyone another flaw to point out! :-)

Feb 8, 2006
More details. Rad support hardware (all new) installed. More other little tweaks here and there. Wish I could back up and take a better overall pic, but pretty tight in the shop.

Feb 8, 2006 (late)
Finally got hood into town and installed on car. Looks good, gives the car some attitude. Alignment is decent, won't do final alignment until all the seals, bumpers and the hood latch are installed but I can see that its very close and the fenders/doors won't need to be adjusted. It won't be perfect but will be one of the better ones I have seen for sure. I always loved these hoods, the scoops aren't very effective at speed, but off idle they do draw in cold air and they look fantastic. This was a Buick remember, it has to be classy too.
The stainless trim at the back of the fenders and hood is also installed. The hood one is ugly as it simply taps into place, you get one shot and I managed to get it centered really well, but I also scratched it in one place. Oh well. Not pulling it off again, they go on easier than they come off and I'm not risking my new paint/clean trim. I was surprised how those little thin strips really complete that area of the car.
Scoops mounted, inserts just sitting in there for pics. Trying to find correct nuts to screw them down
Headlights are in now too. Since I am re-using the original light harness, I took the time to pop out all the connectors and buff them up as needed for good contact. Some were replaced with new. I simply bought new halogen headlights. Some guys are using upgraded brights and relays etc to control them, but this car won't see much night driving anyway. Glovebox and door are in, piston panels temp mounted, doorjamb windlace installed.

Found out the other day that the shop that did all my gold and silver zinc plating will no longer be doing any more automotive stuff as they were bought by another company who wants to stay strictly with industrial stuff. While I guess I can understand the reasoning (kind of, but hey our money is just as good as anyone else's, right?) it led to a mad scramble to blast and polish the last of the parts I needed as they agreed to do just one more batch. Hopefully I got everything needed, even tossed in a few extras for future use...that took up a whole day.
Installed my front bumper rubber strips. They are quality pieces, see my reproduction page for info and pics. I did run into one snag though...on my bumper all the slots were punched out in the same horizontal plane except for the very last one on the drivers side...it was about 1/16" higher...this meant the strip wouldn't fit perfectly without grinding the slot out a bit. Not nice on my new chrome but my own fault for not test fitting first so make sure you double check this BEFORE you get your 72 bumper re-chromed. You can take off about 1/8" max in any direction before you get into exposed holes etc. I sealed the area and the strip now mounts and lines up just fine.
Nice shot of the hood scoops. You can't see it in this picture, but even though the scoop inserts are the identical pattern to the 70 style inserts, the drivers side has less holes open as it mates to the triangular foam seal on the air cleaner. The oddball shape was used to clear the AIR pumps that a lot of 72's had. As far as I know the Canadian cars never had that installed. Note the stainless trim at the hood/fender aft edge.
In addition to all this, I also fixed the dishwasher today!!!

Feb 16, 2006
More details. First on the list is the insulation inserts for the hood. These were bought from Year One and come with all 5 pieces needed (GS cars only use 3), plus two sizes of aft outer inserts (not sure why). Anyway, what I thought would be a five minute job turning interesting real fast. Just stuff them in, yeah right, they are all too large and the first one I tried ended up getting damaged as any folds at all and the gray top material cracks! Luckily the extra pieces in the kit allowed me to make a new replacement, plus there was enough material to cut out a complete set for the Stage 1 as well!
Also, you would think the insulation material could be made of something other than actual fibreglass, damn that stuff itches! They do look good installed, but be careful putting them in.
Fender braces installed, marker lights installed, headlight bezels test fit (nice!), new brake light switch in, more underdash insulation, battery try and battery in, discovered rad I bought will have to go back as it has the extra connection for some heater core setups. No thanks. Also spent some more time playing with hood as some of the bumpers are in. You have to pop the hood spring off if adjusting without the latch as it holds the passenger side up. Get it nice without the latch, as the latch should not be used for adjustment.
Also, note in the picture I have the later style plastic cowl vents installed. This is incorrect. They were used on later cars only (late Nov 71seems to be about the time as assembly manual shows updated drawing 11-26-71 with the plastic vents), the early cars like mine should have the screen style. I just found out the screens are being reproduced so I will probably upgrade that later after all the adjustments have been made. Plastic ones are easier as they snap in, the screen type use clips and the front edge runs under the weatherstripping (not installed yet).

Got a radar ticket today. 16 km over the limit, but following traffic flow. $100.00. I was speeding, but it seems odd that I almost got hit not five minutes earlier from some guy who ran a red light, not sure I saw anyone signal today, a month ago I almost (lucky for them!) caught some jerks breaking into the neighbors garage, and I get a fine for being a menace to society at 16 km over the limit. Whatever. I guess crime doesn't pay for the cops either. Photo radar sure does, 17 MILLION they made last year off a city with a population of 1 million people. No cash cow there (yes I know speeding is a crime but with all the other crap going on out there that doesn't get dealt with its pretty minor I'd say). The irony is I was buying parts for my 400+ hp convertible at the time!! Makes you wonder. OK....rant over...
Feb 18, 2006
The headlight bezels on these cars are a complicated piece. Unlike the 70 or 71 GS which was chrome with some body color around the outside edge, the 72 GS has body color on the outside, chrome trim, and then dark argent painted areas. The masking on this part could drive you nuts!!! I have seen several of these where the masking template GM used for painting actually missed by 1/8" or so, so these are probably way too nice for GM made parts! These are also the bezels that got screwed up by the plating shop so will be replaced once I can find some better quality cores to re-chrome. I had no choice but to use them at this point.

I have heard many people say the grille itself was dark argent as well, however on this car the grille was black for sure, as the overspray on the bottom of the grille where it does not fade was black. I have another original 72 here and will dig it out and check it over one day. Its not really surprising as different plants used different venders and the paint itself would have varied day to day as well.
Feb 24, 2006
More details. Assembled rear bumper with taillights and rubber strips. Everything went together pretty good. Don't overtighten the nuts attaching the rubber strips or you will get dimples in the rubber. Make sure all the bulbs are new or at least good as these lenses are a bitch to pull out with the rubber installed. Make sure to line things up so you can actually get the lenses out (its possible with the slop in the holes to have the lenses actually sit slightly behind the rubber lip and that will surely cause issues on lens removal)! You can get to the backside of the reverse and middle sockets from the back once installed but if the outboard go you better have long arms!!! Also, make sure the ground wires on the harness are cleaned up really well and check your grounds with a meter before installing the bumper. Bad grounds cause more electrical problems than probably anything else on these cars. Chrome is tough to photograph in artificial light.
Spent a few hours beadblasting more parts. Some I need now like the bonding strap and some are for dry film coating/painting and will be used later on, or possibly on the white car.

Feb 26, 2006
Fuel pump is in, it is the deep bowl HD or Stage 1 style which gives you a little extra volume should you need it and has a 1/4" return line which helps protect against vapour lock. One thing to watch out for if you are running an aftermarket timing chain is to make sure the fuel pump arm will not rub on the timing chain. Test fit and make sure you have clearance.You can check by looking down distributer hole with a small mirror and flashlight. If in doubt, slot the pump attach holes with a small round file so you can slide the pump forward. 1/16" is usually enough. The metal is soft so go slow and test fit often. Don't take off too much as the wall can get thin where the arm pivots and you could crack the pump. Things are expensive too. Not even sure if you can get them anymore.
Ok, the issues in picture for the purists are pump bolts are incorrect (I needed pump on asap to bend up up pump to carb fuel line...they can be replaced later); the bolts on top of steering gear box may or may not be correct (black seems to be the generally accepted version although some were gold cad apparently-I have both but like the gold cad); the upper a-arm bushings are aftermarket style (oh well); the yellow code sticker is missing off the steering box (I'll make one!); and I should probably rotate the 3/8" fuel line 180 degrees so you can't see the lettering!! :-) The marks on the top of the pump were there right out of the box. You can also see the aft power steering pump bracket is on now too.

Also, these big engines tend to give issues with the carb boiling over after shutdown, which causes hard starting, sometimes flooding and other great issues like that (F.I. is just so much better!). One way to solve that is to partially plug the holes in the crossover to help reduce the concentrated heat, and the other one is to run insulated carb gaskets. GM actually produced a heat plate at one time which bolts on between the intake and the carb. The idea is direct the heat out and around the carb plus dissipate the heat soak better, and also lift the carb slightly with gaskets to help insulate it. GM no longer makes this part, I'm sure aftermarket does but they are all for Chevies so by the time you are done modifying it can take hours plus it doesn't block off some areas as our Buicks are different. So I make my own. It also gives you a base for the throttle solenoid to bolt to if you are using a non stock/incorrect year intake.
All you need is some aluminum sheet, .060 or thicker is fine, lay out a carb gasket, mark the holes and drill them out. Standard drill bit for the carb bolts and hole saws for the carb opening. Usually you can rough it in with about an hour or so. Use a file or die grinder to do the final carb opening size (better control), lay it on intake and mark off areas that need to be trimmed, clean it all up and you are done.It will be custom fit to your engine. Make sure that is does not interfere in any way with the choke assembly or the throttle. Here is a pic of the one I have started for this car. I don't draw nice neat little pictures and layouts, why waste your time? Lay the gasket out by eyeball, trace it out and drill. Get picky once final shape has been roughed in. I used a picture of an original to get basic shape and my 71 has one on it as well. Final carb opening will be identical to gasket.

Feb 28, 2006
Carb temp mounted so I could bend up the fuel line. You can buy them pre-made but its much cheaper to bend up your own, plus you can modify to fit better or for modifications. It can be frustrating too, take your time and make sure to get the the angles right, a few degrees off will skid that thing into the metal bin. I used my Stage 1 car and 72 assembly manual as a template. Throttle spring color is a bit bright, should be a darker green but I wasn't about to buy another spray can of green for one lousy spring! Also, I painted the alt pulley black as we no longer have a source of zinc plating locally. It should be gold zinc. Also note incorrect hose clamps on bypass hose. I'm still debating what to do with those, starting to think maybe I should get the correct style tower clamps even though I don't like them. Alt belt is totally incorrect of course, but functional.
Also deciding on vacuum setup. Stock is the three port TVS which controls vacuum to the TCS solenoid and the distributor. Some of these parts are hard to find, hinder tuning and they really clutter up the engine. They should be there of course in any of the variations GM used but we'll see how it goes. You can see the wiring harness has the connectors for that and the idle stop solenoid as well. Kinda burned myself there as intake is a 70 so there is no mounting provision for that. It will bolt to the heat shield though (72 intake had a crack clean across the middle of the carb opening and also they weigh a lot more than the 70 version).
Check out the funky carb opening protector. Hopefully I'll have it back in the cupboard before the wife notices ! :-)

March 9, 2006
Installed rocker moldings today. These are ugly to install because they slide down over the clips and fold under, then screws hold them in place. Naturally any time you slide something on paint it is going to scratch and indeed I managed to scratch my passenger side fender despite the protective tape and my best efforts. Should be able to buff the scratch out. At least I was the first to scratch the paint!
These rocker moldings are the Year One reproductions, they are pretty decent quality but the mounting hole placement seems to haphazard (this is the second set I have used now) and the corners are very sharp. I spent some time dressing out the corners so they wouldn't be so sharp and that may have saved even more damage. They do look nice once installed. Big problem on the drivers side though is the molding came out of the packaging with a DENT on the top edge. Very frustrating as I will have to have that repaired now. It is test fit though and once repaired will go on in a few minutes.
Also note that once I got the car back from the shop, I spent many hours adjusting the alignment of the doors/fenders and hood so I was happy.
It is interesting to note that the entire car is outlined with with chrome or stainless trim.

Also installed the hood molding. Love the aerodynamics! Not sure why they did this except maybe to make the front end look lower, as the 70 and 71 GS hoods tapered to a point and look much nicer. I have to be honest and say I have never really liked the 72 front end (this is one of the reasons), the rubber on the bumpers or the blacked out theme. But this car is a 72 so that is the way it is. Oddly enough, being new and fresh it all looks kinda cool. Goes well with the orange.

There are several styles of hood moldings even for 72. There is the straight style, and the curved down corner style like mine. Also, on the curved down style there are two variations even though they have the same part number. On one the bottom side of the chrome extends right to the very outer ends, the second style only goes about 1/3 of the way out and then stops. This leaves a rather unsightly edge right there in plain view when the hood is open, but is also much lighter. There are also two styles of headlight bezels, again with the same part number, the early ones are quite thin and light, the later ones are thicker across the top and have more bracing. The change over seems to be around mid Nov 1971, and interestingly it appears that they went with the lighter hood moldings when they swapped over to the heavier bezels.
72 hood moldings have a habit of cracking right in the top center, they may have tried to lighten up the outer ends to help with that issue.
My car being built 5th week of Aug is very early, should have the heavy hood molding and light bezels. The hood molding is original to the car, but the headlight bezels had to be replaced as they were cracked and/or damaged. All these parts were messed up by the chrome shop, the replacements will be correct style once I can find them.
The bezels. Same part number, and look identical from the front. Note the top edge and bracing in between the "buckets". Early one (Oct 71 car) is behind late one (May 72 car).

The hood moldings. This is looking at the backside...note the different chrome lower edges which are visible with the hood up. Late one is on the top (Mar 72), early one (Oct 71)on the bottom. Also note part numbers are identical.

Mar 10, 2006
More details. Starter is installed....was waiting for the positive battery cable to arrive before install as its awkward once in place. A mini starter would save some weight and make the connections easier, might be something to think about.
Had dent in my new rocker molding worked out by Dave at West Tek. I could probably do it myself (to some level anyway) but sometimes its just easier to have it done. It was fast (1 hour) and inexpensive and I can't find the dent at all, even with knowing where it was. Amazing workmanship. Rocker molding installed.
Carpet is installed. Used ACC as always had good luck and it fits pretty decent. Carpet is always ugly though, and it doesn't help that GM used a 1" thick jute type mat under the carpet. Nobody sells anything like that anymore of course, but you need the thickness or the carpet just won't sit correctly. I used two layers of carpet padding from local interior shop, still might not be enough...we'll see how it settles out in the next little while. Lots of guys are using dyna-mat or b-quiet sound deadening as well, but in a convertible is that much of a consideration?? Can always be added later anyway.
One thing that cracks me up is how the carpet companies package the carpets. They put them in a box about 30 cm too short, so they end up folding over the carpet before rolling it up into the box. Then it sits for however long and by the time a guy buys it for install you have a nice crease that you have to work out....oh yeah and hey guys can you try sewing in the heel pad straight next time??
Mar 16, 2006
Instrument panel is in. Looks good, but final install won't be until after power is on car and I can check lights and switches, etc. Instrument bezels are one item the Buick guys need badly, working with 35 year old plastic is tedious and dangerous, so many parts attach to the fragile brittle plastic and at the very least the chrome finish on these parts is very expensive to have redone (on the order of 300.00US). I was lucky in that this one the chrome isn't too bad, and at this point I just can't justify the money to have it re-done. This is not a showcar, it will get used. I do have a spare however; I may rechrome it and swap out later on.
Since the harness was from a Skylark, I had to modify the gauge connector (see electrical page) so it would run the rally gauges properly. The tach wire was run separately right from factory so that is easy to do. Also, all harnesses have provision for the turbo 400 kickdown, just a matter of untaping and connecting it to the gas pedal switch. Probably the worst part of this whole thing was the heater control assembly and the cables that run the doors. They are spring steel wires encased in adjustable plastic lengths, and are ugly to work with. It would be neat to develop some kind of electrical or vacuum system to run those doors and get rid of those sprawling annoying cables. Someday.
Note the crimpers on the floor which do the correct style GM "B" crimps. They were pricey but have been invaluable in this project. Also note the dust!!! Maybe I need to speed it up a touch... :-)

March 18, 2006
Made up and installed front speaker mod. This time used JBL GTO426 4" speakers which sound a bit nicer but also have much larger magnets....you won't be able to use these ones in an a/c car as they would interfere with the center duct. I would have used the Polk 4" again but couldn't find any. Sony cd player will be mounted under front seat, still trying to sort out the rest of the system. Clarion makes an under seat subwoofer but I also need some midrange. Factory had provisions for 6 x 9's in the back of the rear seat support to bounce off the rear glass I guess, but when top is down and boot is on they are covered up. I want the stereo to be completely invisible. Might just have to go with some speaker boxes behind front seat and pull them out for shows/rear passengers.
March 25, 2006
Factory radio, dashpad, A-pillar pads and kickpanel grilles installed. I'm not totally happy with some of these parts, but a person has to draw the line somewhere (ie: do you go with the dashpad that isn't 100% perfect or send it away to get recovered for $500.00 and hope they do a nice job?). I am going to drive it, after all.

Mar 26/06
New rad installed. High efficiency 3 core. Buick never used 4 cores in any of their small cars that I am aware of. Had it made up as all the new store bought ones had provisions for the heater core connection to the rad itself like some later cars had. This basic rad size was used in millions of GM cars though the 70's. The tube could have been capped off but looked totally wrong. Made up and installed the tranny vacuum line. Wire harness protector blasted, painted and installed on top of engine. EGR line ran (had to be extended slightly to fit properly). Rad cover, shroud and hoses installed. I used the old style tower clamps even though I really don't like them, they only need to last until the shows are done and then will go back to worm style as needed. I'm not crazy on the top rad hose routing, it gets pretty close to the fan but should be ok. I have always heard the 72 cars had a strap for the upper rad hose but this shroud is off a 72 and has no provisions for that (swapped out at one time?). The original small block one does have a strap though.
Part of this is my fault. The pulley selection I used (to try and keep the 350 look going) goes with the short water pump. The fan clutch (mid 80's HD style Chevy big block truck) only has a 1" shaft, so the fan is a touch more than half out of the shroud. Cooling wise will be fine but the correct clutch would put the fan about 1/2" further into the shroud, which would give a bit more clearance on the rad hose. This is one of the decisions that maybe wasn't so smart in hindsight, but if need be, I do have a long pump and the HD cooling pulleys or could get a different fan clutch need to make it all happen. Could also go to a 19" six blade fan instead of factory 20" five blade. We'll see how it goes.... getting close to fire up at any rate.
I did not refinish the shroud. It was pretty decent shape (amazing really after 35 years of service!)but does have a few scratches here and there. I have seen lots of black painted ones and they look nice but the shroud is a gray color and you can see the texture of the material it is molded from, to me that looks better. A guy could probably sand it down slightly and then put a matt clear on it to save the grain but right now I'd rather not mess with it. Many of these later items going on are easy to remove and redo if needed so that takes the pressure off somewhat.
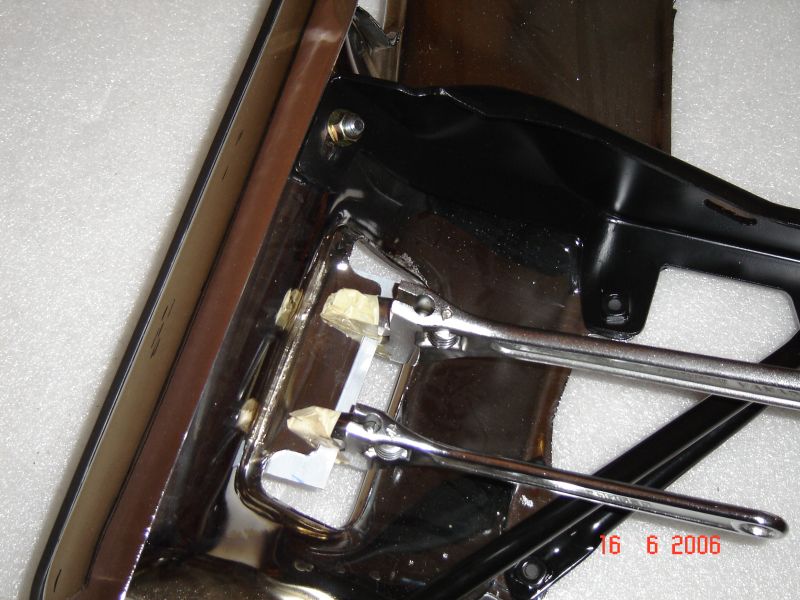
Top pump, actuators and lines installed, and it is a major milestone to see the top assy run up and down on electrical power. COOL!! This confirms my top relay design, and also confirms my motor/pump overhaul. Currently using 20 amp glass fuse instead of the usual GM 40 amp breaker just to check power usage, and it has not blown yet. Correct molded all red positive battery cable (custom made) should be here any time now. It will be added to their catalog for purchase at some later date (see electrical page for details). Top runs very smooth but will need some more adjustments.

April 7, 2006
Some small details completed. New battery cables are installed...that was bitchy with the block and bracket and lack of room to work with...#2 gauge cable does not bend so easily! Looks good though, the 100% correct battery cables look really good connected to my 100% incorrect battery!! :-) Second set of top frame siderails beadblasted and (some parts) painted. Power steering pump cleaned up, detailed and installed, no lines yet, they will be added after engine fire up (one less thing to worry about). Plug wires in. Front seat taken apart, plastic parts dyed as have not been able to find them in white (still looking), brackets blasted and am looking for correct style foam to recover seat with (it appears however that they are not available).
April 18, 2006
Second set of top frame side rails are now installed. First set gave me some issues, buying used you never know what you will get. Anyway, these ones were not as sloppy as first set and went in nice. Top now tracks and sits square both up and down. Other ones worked but not as well, as one side seemed more worn than the other. Side glass is adjusted to the top weatherstripping too. That took many hours, basically I set the door glass to the A-pillar and the top rails, then adjusted the 1/4 glass to the front glass and top rails. Sounds easy but can be very frustrating...every change affects another and with even the roof being adjustable on a ragtop it gets complicated real fast. Also, there is slop in the window regulators so need to compensate for that as well.
The front glass sits in just a touch compared to the 1/4 glass at the top which will give the 1/4 glass vertical weatherstripping a good seal once its installed. With no frames around the top part of the glass, this style is notorious for wind noise. I don't plan on the top being up much anyway, but you do need everything to work. Once the top is covered, you can only adjust the glass if needed, adjusting the top will cause wrinkles so it needs to be as good as you can get it before the top goes on. Even then its a crap shoot as the top install will load things up differently but hopefully the glass will have enough adjustment in it to take care of any issues.
April 25, 2006
Originally I was going to wait for the corner rubber pieces for my rear bumper before installing fuel tank. The idea being that it would be good to test fit tank after bumper is installed and make sure the filler neck (that is accessed through the rear licence plate) sits properly...there have been some issues with the repro tanks apparently. Anyway, since Year One is taking FOREVER to get those parts to me I decided to go ahead and install the tank. That turned out to be a very bitchy job, would be much nicer on a hoist. The new straps don't seem to snug up very well either despite lubing where they run on the tank and the attach bolts. Might just take some time to settle. Also ran out of 3/8" pinch clamps, so that held things up as well. The problem with these clamps is you can buy them locally, but they come in a package of various sizes of which half are totally useless, and the packages are fairly expensive. Also the paint on them is very crappy.
I have found the best way to deal with this (for me) is to simply round up as many clamps as I can, beadblast and paint them myself. This way you get the colors, sizes and numbers you want and overall much cheaper than buying new. I have attached a pic of the 3/8" clamps drying, GM also used 7/16" (yellow) and 1/4" (red) clamps like this in great quantities. Note the color in the pic is quite light due to the flash I used for fill. They are a darker color in natural light, and the paint was picked up at a hobby store as its the only place I could find that had this matt green. Use very thin coats and when installing, put tape on the jaws so you don't peel the paint off.

May 15/06
Wow this thing is starting to look like a car. STILL waiting for correct hose clamps and rear bumper corner rubber inserts...I'm getting ready to give up on the hose clamps and just go with modern worm clamps as I originally planned. Its holding up the firing of the engine, and I am getting impatient. Rear seat is in and front is ready to go any time now. Top has been tweaked and is ready to be covered. Fire engine, bumpers and steering wheel and its pretty much ready to roll....
Also, I received a reply to a letter I wrote to our environment minister Rona Ambrose regarding collector or antique vehicles. I was happy to hear the government is not concerned about this particular section of the motor vehicle population as "Antique motor vehicles are not considered a major source of air pollution.." Glad to see that common sense is still alive and well in some parts of our government. Naturally she will get sacked fairly soon I am sure.

May 26, 2006
IT RUNS!!!! Amazing how well it started given that everything has been apart on this car including the engine itself, the starter, carb, dist, electrical, cooling and fuel system. Didn' crank at all, just fired right up. Only issue I had with the fuel system was that the feed line clamp off the fuel tank sender didn't seal the connecting hose properly. This may have been due to using F.I. hose thinking its stronger but at the same time its also stiffer so its possible the clamp can't squeeze it enough. I changed out the hose and clamp and the problem went away. This involved dropping the tank slightly for access.
Also checked fuel sender calibration. When reading empty, there is still about 2 gallons in the tank.
I use an old gutted distributer to prime the engine, this way there is no down force on the oil pump. Once fuel was in tank it made its way to the pump with no problem. I used a screwdriver into the carb float area vent to fill the carb bowl by trickling fuel down into the vent, and a bit down carb. 20 minutes at 2000 rpm for break in (even with used cam), down to idle and shut off after short video for posterity. Nothing blew up or came apart so that is a bonus. I have bypassed the heater core for now so I could fire engine. Initial timing was set before firing by using a dialback light, and although old and rough its close enough for now. Oil drained and refilled.
Valve train is fairly quiet. There has been a rash of crappy lifters for our engines over the last few years, some guys have changed set after set to find good ones. Add into that higher spring pressures, more aggressive cams and its not unusual for a healthy engine to clatter some, esp given Buicks marginal oiling system (stock). Hot Rod magazine had a great article a month back on why so many flat tappet cams are getting wiped out, and crappy foreign made lifters was one of the reasons, along with less additives in oil, camshaft quality, lifter manufacturer buyouts and problems, etc. By using adjustable pushrods a guy can run Chevy lifters in a Buick, and I may go that route if need be as there is more selection and (it seems) slightly better quality. Always use a can of GM EOS on initial startup. Might not be a bad idea to run it all the time given that the zinc and phosphates in new oil has been reduced so much.
The new Edelbrock aluminum heads with the Chevy style rocker setup might be a good setup too, allowing adjustment of valves individually without needing adjustable pushrods. TA heads still outflow them though and aren't much more money. Still, if the lifters bleed down too fast not much a guy can do except replace them, and it seems now that with rollers being the preferred way to go for many years that the flat tappet doesn't get much attention anymore.
It seems a bit loud with the 2.5" system on there now, but I can always swap out mufflers later on if needed. It sure has a nice rumble to it but I like my cars quiet.We'll see once its out of the garage and on the road.
Carb upper gasket leaks a bit after shutdown. Could be float level or air horn might be tweaked. Have to look into that.
Fuel vapor canister installed and connected.
Finished up column install, dash is now pretty much complete and ready for front seat.
Brake light has been on since dash install. Bled all four corners again and that seemed to have solved that. It reset itself with a good push on the pedal, even though I didn't get much air out of the system. There was a bit though. I will install the e-brake cable next and get it adjusted to perfection, just in case there are problems once on the road.
May 27/2006
Finally my new rally wheels showed up. I went with the stock size, 15 x 7. I ordered them locally. Very nice chrome and assembly, however one insert had pretty crappy paint so instead of returning it (and waiting for replacement) I decided to repaint it myself. Not hard, but labour intensive with all the nooks and crannies. They balanced out ok but since I wanted no weights on the outside edge they did take some larger weights on the inside. I'm pretty sure my choice in tires didn't help as they are not expensive tires. I couldn't help with any of this, however if I had access to the tire machines I would have tried moving the tire on the rim, that often helps.
I found some seatbelts to replace the retractable reels I could not use (see interior page). The buckles will need painting but otherwise they are nice shape.
Power steering pressure hose is in, still need to make up the return hose once I locate correct style clamps. Details like this can take a while to sort out. Eventually I may go to a later fast ratio box so would need metric hoses, but for now close is good enough.
June 8/2006
Painted wheel turned out very nice. Only took 8 hours of my time! I love the white letters and how then look when car is rolling, nothing says late 60's/early 70's more than that. They were factory equipment on this car (Firestone Wide Oval G60-15's). Note the reproduction wheels have the deeper dish like the 70 "WG" style wheels, this also gives the car an extra 1" track front and rear, but is technically incorrect for this car as 71/72 went to the narrower offset rim. They also have chrome spokes unlike originals which are stainless. Centercaps are NOS GM silver center style which were used for 71/72 only.

June 11,2006
Sheesh!! Some days I really wonder. Take a look at this pic. What am I doing?? Well it turns out that along with barely average chrome, the shop took the time to straighten out the flanges for the signal light mounting on the front bumper. Except they are NOT supposed to be straight!! I never noticed this until I started to assemble the front bumper. The marker light screws come up through this flange, and through the marker light and clip to hold it all in place. With the way they moved them up, there was a 5/16" gap at the bottom and the light did not sit down around the opening like it should. The stupid part is I test fit everything and I told them that, just chrome it and don't make any marks on the backside if possible as they can be seen with the hood up. They didn't listen at all. The only saving grace is that it was a minor tweak so no damage caused. The metal brace is to set the bend point and spread the load across the entire flange for an even bend. I'm not sure who was more stressed, the bumper or I!!
After all that BS, I did get the signal lights to sit properly, and they look good. Light lenses were polished and painted (inside and out), attach clips were plated, bumper braces are powdercoated, bumper brackets are painted, the original bolts are plated (black ones along bottom and signal light attach) or new (stainless capped ones on the bumper exterior). You can see there are marks on the inside from where they straightened the bumper, hard to avoid. Most bumpers of this vintage have some damage, I will keep looking for a better one and may replace this one later as these marks are visible with the hood up if you look down. They did keep it to a minimum but overall I am pretty unimpressed with the quality I got on these bumpers. Probably better quality than GM did, but these kind of issues are incredibly frustrating and expensive, and so avoidable.

Ran engine again today for a short while so I could set the timing better, check the P/S system for leaks and operation and check heater hose connections for leaks as I finally got proper style clamps. Note only Flint cars got the corban clamps, other plants used the tower clamps on the heater hoses. You just KNOW those clamps are gonna spill blood one day!! Routing of hoses as per assembly manual, I tried a few other ways but none looked any better. I have decided to bypass the GM three port temp vacuum switch setup and just keep it simple for now, can add it later. Currently only have water in car, will drain out and add antifreeze now that I know there are no leaks or issues. Plan on routing plug wires a bit better as well. Need breather hose. Firewall still needs square plug, and I need to find correct steel line setup for the brake booster line (or bend my own up). Lots of time for small details like that later, and really its not necessary to be correct on a lot of things as the engine is a 70 455 in a 72 350 car so anyone with some knowledge will see that right away. Still I try to keep things authentic looking.

June 17, 2006
Rear bumper is on. It will need some final adjusting but my help only had a few minutes so we roughed it in pretty good and will tweak it later. The 72 assembly manual specs the gaps to the body as 0.70 + or - 0.02". That is quite a bit and I usually shoot for 0.50"on the sides, only to make it look neater. It can be hard to do though as there are two large rubber blocks that sit on a pinchweld and bumper is supposed to rest on those, but with the tighter gaps you have to compress these slightly forward and the bumper top edge won't rest on them. Don't scratch the paint! I have seen some cars with pretty large gaps from GM so the biggest thing is to make it even side to side and across the top. Also, if you go too high you start pushing on the 1/4 extensions as they have a flange there too. The bumper can actually be twisted slightly to get alignment better if needed.
Don't forget to connect the wiring harness :-)
Also, as I was worried it turns out the fuel tank filler neck is too low. You can get the cap off easily so its not a big deal. I'm not going to pull the tank now, it goes on my list of things to adjust later as access is easy. It would have been nice to find out before there was fuel in the tank but too late now. Impatience will do that to you. You'd think if they went to the trouble of making the tank they would make it right! This is a Goodmark tank, supposedly one of the best out there. Raising the bumper higher and further forward than GM designed doesn't help either.
I can also see the exhaust tips will need some adjusting as well now that there a reference. Again not a big deal but the details make the difference and take the time.

June 17, 2006
Front seat installed. It's not complete yet, there is some stainless trim to be installed, seatbelts and center armrest as well but I got to sit in my car!!!! Sounds silly, but that has not been possible for about 5 years. The only adjustment on the factory seat is fore and aft. Seat backs are set by stops (and locks), so the only way to adjust the recline is to shim them to what the driver prefers. Also, GM bolted the seats right to the floor and the carpet had slits in it and just ran up against the legs. I bolted mine right down on top of the carpet, it is not correct but looks much cleaner, and is easier to maintain. GM also left the mounting legs bare metal (although it appears some plants may have sprayed the back part of the legs black).
Flash makes the interior look really white, its an off white with a hint of tan and of course everybody has different monitor settings. The seat is actually very comfy, and seems to sit higher than the buckets in my 71. No doubt it will settle out after some use.

June 18, 2006
Details, details. While installing the steering wheel noticed the horn contact didn't seem to work very well. Turned out just be dirty and corroded from the years of service it has seen. By carefully pushing out the center posts of the three plastic retainers, you allow the tangs to bend inward slightly and can pull the entire assembly apart. Quick scrub with scothbrite will remove any corrosion and buildup, giving better contact. Make sure when re-assembling to put the pieces together and push the plastic retainers through the whole assembly together. If you try to insert them piece by piece, most likely the insulating gasket will tear. Also keep an eye on orientation as there is one tab that is different from the rest (on the black part) and engages the horn cap, you need to align that tab with the scribe mark on the top metal ring (can't see this in pic but watch for it). This will make sure the contact pin from steering column touches the tab and the steering wheel centercap (horn cap) will be correctly orientated.
A new horn contact kit from GM finishes it off. Works perfect. With the drivers out there today, the horn could be very important.

Buick rally steering wheel installed, same style as many other GM cars just with different cap. The blanket on seat is to protect it while I work on stuff. I can see already the white is going to be tough to keep clean. If you look really close, you can see brake pedal pad is missing. I have a repro from Duane H. and am currently prepping the "disc brake" ring to go onto it. Duane has some great repro parts and more knowledge of these cars than any one person should have!!

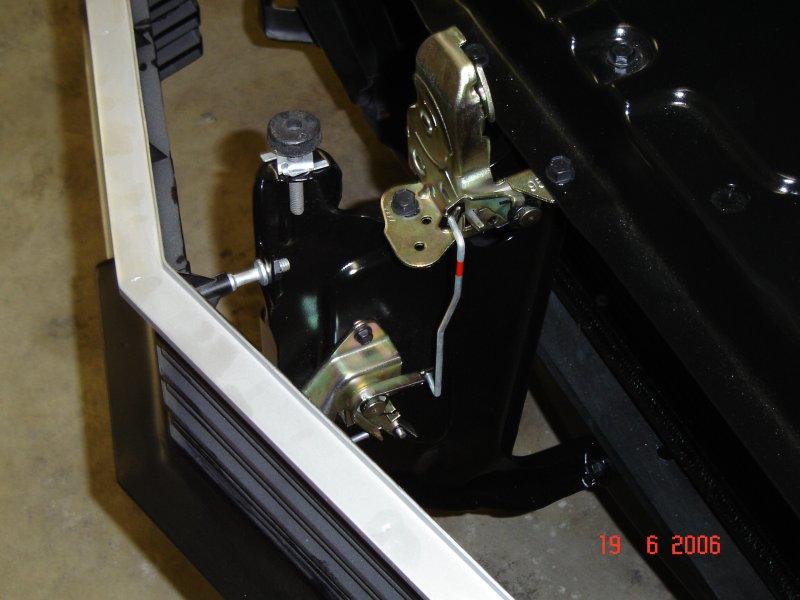
Hood latch assembly and grille. Lots going on here..the upper latch is correct gold cad or gold zinc plating, attach bolts are replated. The lower latch should be silver zinc but plating shop did it in gold so I went with that. It looks good, just not totally correct. Easy to change later if desired. New GM clips hold the replated rod in place, the red stripe was so factory workers would know which way was up. Grille studs are silver zinc plated (correct) with the original GM washer head nuts replated black. Hood stop is new GM but is also incorrect. Correct style had a rubber top that slipped over the stud, no hole in the center. I have not been able to find replacement rubber (yet) so for now these will do. The original studs have been plated so once I find the correct rubber tops they will go in. Apparently Steel Rubber makes these so we'll know soon.
Note mold marks in top edge of grille. I was careful while prepping and painting grille to not cover these up. This is the original grille to the car.
With hood closed. Grille has been sitting in storage for 5 years now, thus the dust. Note how the front of the fender is simply folded over and makes the front edge. Also note how the edge is actually thinner than the hood. Hard enough to get decent alignment on these old cars and then GM does something like that! If you align the top edges of the hood/fender then the gap between the bezel and hood will be smaller than bezel and fender. That's better than going the other way for sure, at least at shows with the hood open you won't see that. If you look at these cars, some have truly horrible alignment from new.
Fenders bolt to rad support with no adjustment, as does grille (no slots, just holes). The grille alignment is dependant on how the rad support was welded together as the panels really have no adjustment in relation to each other other than slop in the holes or (if needed) shimming the fenders outward. The headlight bezels are adjustable, but not much so they can be moved slightly to make the best of things. I have found the front ends of these cars to be rather disjointed compared to some others of the same era. Note how the grille simply extends down behind where the top edge of the bumper will be to fill in the lower bumper holes, and how it angles in at the outboard ends (why?)...From some angles this kind of styling is very awkward. These were some of the last cars to have this style bumper setup, into the 70's/80's they started using plastic filler pieces everywhere to smooth bumpers into body panels and today of course they are completely integrated.
My grille seems to sit a touch high, but it could also be due to the warpage the plating shop did to the hood front molding (what is it with plating shops?) which drops it down slightly. Overall the alignment is very good.
The inner part of the fenders are supposed to be painted black to hide the sheetmetal behind headlight bezels.
Drivers fender looks darker as it had a towel on it, hood and far fender still have 4 months worth of dust on them. Note rad support mount (NOS GM).

June 19, 2006
Headlight bezels are on, and despite the chrome shop screwing those up as well they look ok once installed. My thinking is that they are right on the front of the car and take a lot of abuse, so I will find another set and eventually replace them. Gaps are fairly even, again not much adjustment available except a bit side to side. There are four plastic attach points and only one is visible so if needed you can shim the other three slightly to close or open the upper gap (by rotating the entire bezel), you can't go too much though or you will affect how they align with the bumper. Most of this alignment is set with the body assembly, and this is where all the previous work test fitting will pay off (hopefully!).
Also installed front seat armrest and center seatbelts, adjusted hood closing, changed the rear seat seatbelts, some other details.

June 20, 2006
Bumpers on these cars are huge sources of frustration. They are expensive to chrome, heavy to haul around and ship if needed, hard to install and align and yet one of the most visible parts on the car. Nobody makes repros, so you're dealing with 34+ year old parts too. GM fit was indifferent when new (I've seen really rough edges, unbalanced cutouts, etc) so good luck getting perfect bumpers!!
Its best to have two people to install the front bumper, but you can do it yourself if you are determined. Lay the bumper down on something soft to prevent scratching it, with all brackets on but loose. You can carefully lift each side up in turn and get the aft bolt started (leave loose). Now pull the bumper all the way forward in the frame/bracket slots and lift up and set it on your jack (with more protection for the chrome of course). From there you can jack the bumper up to the right height, slide it into place, then tighten the four frame/bracket bolts. I've done it this way before and it works but this time I had a friend drop by to help out. Here is the bumper with the aft bolts installed, front edge blocked up and waiting....

The 71 and 72 style front bumpers seem to bend up in the middle really easy over the years so always check for that with cores. I like to set the middle part of the bumper first with the frame mounts, get it level and centered with the body, then tighten all the center section bolts. Believe it or not, the outer sections can be twisted and aligned, then those bolts tightened to hold it in place. Every car I have ever seen the top aft edge of the bumper (where the protective masking tape is in the above picture) is closer to the I/B side than the O/B side of the headlight bezel by 1/4" to 1/2", no idea why. My car is no different and luckily is on the small end of the tolerance. Oddly enough the bezels are tapered that way so perhaps it is planned? Not much can be done about it really, you could try shimming the headlight bezels forward slightly and moving things around but be aware this then affects everything else in the front of the car.
I had test fit this bumper when in primer. The funny thing, these cars never seem to go together the same way twice. We were so careful to get nice tight gaps with the forward door to cowl area, then fenders to door and the fenders to hood that it almost appears the bumper is about 1/4" too wide since we closed the car up so much!!LOL Where's Chip Foose when you need him, doesn't he always cut bumpers in half and make them narrower?? :-) Again GM specs 0.70" gap around bumper and I shot for 0.50". Any tighter than that and you could chip the paint as these things do flex some.
I really like how the black scoops and grille ties everything together.

June 24, 2006
Passenger door panel is on. This should have been a simple matter of setting it in place and snapping in 6 clips. Not a chance!!!
Previously when I test fit the panels, I just looked to make sure the clip slots were in the right place, close enough. However, once I actually had the clips in the panel, it became obvious there was a small problem. The panel fit fine, the three aft clips lined up nice but the forward clips were out by about 3/16" (too high). It was obviously the clips as the panel was square on the door. The temptation is to try and slam them into place, DON'T DO IT! You will tear the cardboard backing and then the panel will never sit properly. I solved this by getting a new single edge razor blade and carefully trimming the slots for the mounting clips as needed. The trick here is you need to cut through the cardboard and foam but not the vinyl skin. Take your time and be careful, one slip and the panel is ruined.
Panel was then installed using two top clips only and the window run up and down to make sure it was not too tight. Not bad, so panel popped back off. New clip receptacles were installed into door, one last check inside door, water seal was installed, then panel was put on, lined up and clipped into place. Nice!
Next comes the door handle, and that too gave me grief! The new GM handle turned out to have some flash inside from the milling of the slots for the retainer. It wasn't obvious but the thing wouldn't slide on. I started wondering about the splines and size of the shaft and who knows what else GM might have changed even though its the same p/n as original, but once I noticed the milling flash (it was not obvious) and pried it out it went on fine. Mounted the armrest and decided to stop there.
Lots of things to note in picture. The 5 lower screws GM used to secure the bottom edge are not installed yet (I've actually debated using velcro instead of screws as it looks very sanitary without the screws there). The door sill plate is not installed. Power window switch needs good polish (possibly buy new) before it goes in and the door lock knob can wait until the end.
There is supposed to be a "GS" emblem on the door panel just above the armrest. In 72 only the convertible GS got this emblem (in 71, all GS cars got the same emblem). Originals are long gone of course, and the reproduction set I bought were very disappointing quality (looked like they used a starving rat to gnaw the details out!), so I decided to simply go without until I can find a decent set. You'd think they went to the trouble of making it, why not make it right? It's the wrong size, too thin, letters too small and buick tri-shield embossment is totally incorrect!
The armrest pad itself is original foam covered with vinyl material that legendary supplied me with from the same batch that my panels were made from. If you look closely you can see some small folds under the bottom edge, this is actually authentic GM, they all had folds! Lots of heat helps, don't pull too hard or it distorts the corners. Again, this was done as the repro pads I bought (and returned) were total crap. Armrest bases are white in color but dyed to match this white, the chrome plates behind them are reproduction. New GM handle and new GM door lock ferrule.

June 27, 2006
Drivers door panel on. It had the same issue as the passenger side but this time I was prepared for it. The only thing different about the drivers side is that it has the remote operated mirror, which means the mirror needs to be mounted on the door and the cables run before the panel goes on. Up to this point I had left the mirrors off just for a little extra room. Played with the exhaust alignment as well.
June 28, 2006
Ran the screws in for the bottom part of the door panels. Some holes were there previously others I drilled...I used the factory forward edge hole, then worked the panel flat as the screws went in towards the back edge. These repro panels tend to bulge in the middle, so if you can work that out its a bonus. Also installed the boot. I debated about this for a long time, it attaches with a special plastic fitting that slides into the flange on the rear seat support, then plastic tabs on the back edge slide UNDER the chrome, its pulled into place and then a couple snaps on each piston panel hold it in place. Obviously, sliding plastic tabs between the chrome and the paint is going to cause scratches, but I decided to put it on anyway. The chrome is pretty tight against the body. It will be months before top gets installed and I want to drive the car.
The boot fits ok. It came out of the box with a small tear already repaired (WTF?) so who knows how long it will last. Overall it fits pretty nice. It doesn't come all the way forward on the chrome and it does sit out a bit but looks much cleaner than with the top mechanism/trunk exposed. Once the vinyl sees some sun and heat hopefully the wrinkles will disappear and it might need some more tweaking as well. Some other small details like the door lock knobs done. Seat trim, sill trim and outboard seat belts still need to be installed.
I have decided for now just to leave the shoulder belts out.

July 4, 2006
Almost there! Park brake cable run but not adjusted yet. Front and rear suspension torqued up now that the full weight of the (almost) completed car is on the suspension. Stance is everything, and I find these cars look the best when the top edge of the door is level, this gives the whole car a very slight forward rake. It sits really nice without any adjustments, hopefully front springs don't settle too much.
Front swaybar installed. I used a poly kit on the endlinks. Brackets are plated, attach bolts are originals replated, new rubber bushings. GM left the swaybars natural metal, I painted mine to keep it from rusting right away. This car came stock with the 7/8" rear swaybar and a front 15/16" swaybar. The hot item is to put a 1 1/4" front sway bar which is a tremendous improvement in cornering, but also affects the ride a fair bit. I'll start stock and take it from there, as I have no experience with verts and how they react to mods.

July 6, 2006
Park brake adjusted. You really must have this adjusted properly, should there be any kind of problem with the service brakes it could save your life.
Seat trim installed. Also installed NOS door sill plates. They look nice but scratch very easily. You can see the outboard seatbelts are also installed (note the slot which the shoulder belt clips into). I am looking for new covers. They look pretty good but I want better. You can buy reproduction RCF400 series covers, these are RCF401 series though. It looks like the change was the switch for the seat belt warning system, so they had a cover on the backside that can be opened for access. Cannot confirm that and have not been able to find much info on them yet. Somebody will know. GM had lots of different seatbelts in those years, it can be quite confusing.
Sunvisors are in. Discovered the drivers side bracket has a hairline crack in it which was not noticeable until it was loaded up with the sunvisor installed. New repros are on the way, meanwhile it will be fine for initial shakedown runs.
Started front end wheel alignment but ran out of shims! Its close enough to drive car, but I'd like to see how close I can get it with my gauges before going to an actual alignment shop. And even finding an alignment shop is touchy, they're so used to banging away on salt encrusted rusty crap that I need to be sure they understand what I'm after here. Had the perfect setup, used to be a place a few blocks from my house, guys there were great, said they would measure it and I could do the adjustments (how cool is that?!). Place got torn down last year! LOL Also, I have been trying to find the correct style shims, seems most shops now just use the square bodywork style shims or re-use old shims. The ones I have now are beadblasted and zinc plated originals.
No floor mats yet as nobody makes them, and they are impossible to find after 35 years. Rumours are somebody is going to be releasing them soon. I hope so, it is a needed item for many, many cars. I might pull the ones out of the hardtop for first few drives. We'll see.

July 8, 2006
Door power window switches are in. Started on front end alignment. Worst part about that is trying to get car perfectly level, pretty tough on a sloped and contoured garage floor. Got it pretty close. GM specs +1/2 camber, -1/2 caster and 3/16" toe in. On the road specs are huge (ex: camber +1 1/4 to -1/4 is acceptable). I go with more aggressive settings from experience and others advice. 0 camber (many run -1 or more), 2.25+ caster and 1/8" toe in. These help prevent the tires from rolling over in corners and center better as well.
I'm not sure what effect this has on tire wear, seems to be ok but these cars don't see much driving anyway. So given the huge allowable tolerances I should have no worries. Will get it checked at a proper shop eventually and see how close I am.
July 13/2006
Drove the car today!! Went very early to avoid traffic and hot temperature. Car is very solid, tracks well, brakes well and handles well. Did the ring seat thing and then bombed around for a bit. We were amazed how quiet this car is inside at 60 mph, normal conversation is easy, hardly any wind buffeting or noise but exhaust is kind of annoying. Some minor issues to deal with (tach is wonky, and mufflers are too loud for my taste), and of course some completion details to still deal with, but car is basically complete.There will be more pics here in the near future, detail shots and such, but that is about it.
This is the first time in 19 years that this car has been on the road.
I will be rebuilding the original 350 and tranny for this car as well.
This is my last old car project unless I find one of a couple cars I'd like, chances are very, very slim of that. There are many reasons for it including health, time, and of course money as the speculators drive the costs way up for the average guy (and as the money involved gets bigger, so do the conflicts....run into a couple real asses lately). Wish they would leave our hobby to the enthusiasts. I do plan on going through the Stage 1 at some point in time, but not for a while.

Here is link to small (crappy) video of the first drive. After all the hard work/time/money it was fantastic to drive this thing. Its going to be a lot of fun!!!
July 16, 2006
Slowly working out bugs. Swapped out mufflers with stockers and it is quieter but probably still louder than I wanted. Might just go back to stock (2 1/4") or add resonators. Maybe have 2 1/2" headpipes bent on normal machine? Swapping wheels off the stage 1 fixed a low speed wobble..looks like one tire has a belt separating ....those cheap tires are biting me now!!LOL Still under warranty as they only have 75 miles on them and within the 3 years so we'll see how that goes. Tach needs repair (will do this winter) and thats about it other than some unfinished details. Not bad really for a complete frame off resto with nothing going untouched. No doubt there will be more issues as time goes on but that is normal for any car.
The car is sure fun to drive. It handles better than I expected, the variable rate steering box works well, its very solid although you do get "wiggles" over some bumps. It IS an antique convertible, after all. No squeaks, rattles or roughness and that is the difference between an old car that has been rebuilt and one that has just been touched up as required. Stereo sounds about like 1972 did (I'm guessing here!) with the boot on!!LOL It really likes the 3.08's too, mid range is very strong so far (1/2 throttle) and yet 60-70 mph cruise rpm is nice too.
I have no idea why I waited this long to get a vert. It is awesome!
July 28, 2006
Few more details sorted out. Got the correct screen on the cowl, along with the hood to cowl seal. Biggest problem here was that once closed the new seal takes the slack out of the hood hinges and the hood sits too high at the back when closed. To help this I found some smaller attach clips for the seal itself (ie not as thick) so it could compress a bit more, I also adjusted the hood hinges to compensate. No big deal, except adjusting the hood hinges moved the one corner of the hood so it was not square anymore so had to adjust that out as well. Once the seal compresses a bit I will get the proper clips back in there. No doubt the tight assembly and small gaps aggravated things here (if the fenders were shimmed up higher the seal would also fit easier).
Be nice if a guy could buy new hinges but nobody makes them.
Also note the assembly manual shows the w/s fluid hoses running forward between the cowl and the hood to cowl seal (!) and then up to the hood nozzles. I have found by making them fairly tight when the hood is up, they will stay behind the seal when the hood is down and still work fine. I would think running them like GM wanted would only cut off the flow. Odd.

Also installed the radiator support cross rods. My understanding is that these were a GS only option, although the 72 assembly manual does show them spec'd for Skylark Custom convertibles as well. The 71/72 styles have the bend in them near the bottom, the 70 ones were straight. There is a small piece of rubber hose with the slit cut in it on the back one to keep them from contacting each other where they pass in the middle. These rods run from the upper section of the rad support down to the opposite side front bumper bracket, and pass through the hood latch support through a pre punched hole, adding some stiffness to the whole front end.

Aug 22/2006
Car is on the road and works pretty well. Still sorting out the tire issue. They were re-balanced but all that did was move the wobble up 10 mph. They'll end up swapping out the wheels/tires but you have to jump through the hoops to get warranty and they always seem to make things as annoying as possible, perhaps hoping you will go away. We'll get it sorted out.
On the way home accidently drove past a school (normally avoid them with the cops always taking radar, slow speed, buses, and kids running crazy everywhere), bunch of kids ran up to the side of the road and gave me the thumbs up. Several yelled "Cool car!". I waved back. Pretty funny considering all the high price machinery around there as parents were picking up their children. But you know if the kids like it, then it must be OK! Also had a small get together yesterday. Good people, nice cars, it was fun and interesting. We did some video out of my car (no roof makes it easy) so were last in line for the cruise so we could capture the cars, which oddly enough put my car right at the front of the line up when we parked for the pictures.
Top install in three weeks, will post final pics then.

Oct 1, 2006
Wow! Top is on, and once again everything changes. It is a close match to the "covert" color GM originally used as far as I can tell from the samples I have left. It compliments the rest of the car very well, brings out the orange yet doesn't take over. Glass fits very well, although door glass might need a tweak or two. The guys at Cascade Vans did a great job. I even got a compliment from them on the operation of the top frame, which is pretty amazing considering I wasn't sure WTF I was doing when I first started on it. From inside, first impression is lots of headroom, odd to have a roof over your head, and that back window is small! Note the tires don't match, still waiting for warranty on wheels so those are off another car.

Fron this angle you can see the rear glass window is quite small. From the back it gives the car some attitude.

Just showing how all the colors work together. Inside of top is black. Still working on wiper arms. Note the top has a few wrinkles in it from sitting in the box, they will work themselves out over time. It has been 6 years (less 3 weeks) since I dragged this car home. Car is driving again after 19 years of sitting. It has been a long haul, I think the end result is pretty good all things considered.

Oct 25, 2006
Back seat area final install completed today. This was removed for access so the top guys could do their thing. Since it was all in before, went pretty smooth. I also installed the front seat shoulder harnesses. These are bizarre, bolting to the only big structure in the area, the top mechanism main bracket beside the rear seat. They then go forward, though a small plastic sleeve between the piston panel and rear interior 1/4 panel, up and over the front seat, and then (on my car), clip into a slot on the front seatbelt.
A note here, on my car I went with the deluxe retractable and locking outboard belts. These have a longer tonque which includes the oval slot used for the pin on the shoulder harness. The pin was a 72 hardtop shoulder harness item, and since I had the shoulder belts made up (originals burned) this is possibly not correct? Seat belts are a tough subject to research. It does eliminate the need for another set of buckles in the front seat. The only catch is you can't connect the shoulder belt afterwards, ie, the pin needs to be in the slot before you latch the waist belts together. Then you adjust the shoulder belt to fit, as it is not retractable. There is no guide over the seat, so the whole thing gets messy. GM would have been smart to make the shoulder belts locking and retractable, and also a guide to hold it all in place. But then again, there is no space for this. This shoulder belt system is designed to withstand 30mph impacts with no deformation to the attaching structure.
In the picture, you can see the clear sleeve the seatbelt slides through. Oddly enough, it is quite free to move (you can see it has moved to the high side with belt up and over seat) even though the panels pinch it all together. Rear passengers are effectively locked in when the front seat passenger is wearing this!!

Then once over the top part of the seat, it all clips together. Pretty odd...I'm amazed 66 people actually ordered it! LOL There is a small plastic mount that screws to the bottom of the rear armrest under the courtesy light designed to hold the seatbelt when not in use. However, the ones I got were bad quality so I have elected to simply leave them off until I can find better.

The entire seat belt thing for 72 is very interesting. Starting January 1, 1972 every car was required to have a seat belt warning system installed. This led to some unusual items as well. The standard gauge cars simply got another warning light under the fuel gauge and a buzzer, but if you had the rally gauges there was no room in the cluster, so GM actually spliced into the harness between the rally gauges and main harness, then ran the warning light circuit to a pod mounted on top of the dashpad! This system also involved a pass side seat sensor and seatbelts with switches so the system could tell if someone was in the seat, and buckled up or not. The option to the seat belt and warning system for manufacturers was some kind of passive restraint (airbags) so naturally they took the obvious way out. Around late-73 there was a starter interlock mandated on this same system (or passive restraint system) but the public outcry over it was so huge that congress actually repealed the law (as a sidenote Oldsmobile was the first (so quick search shows) to have airbags installed in their cars, available in 1974, and very expensive).
My car being an early build machine does not have the warning system.
This shot puts seat belt in perspective.

Nov 3, 2006
Got talked into it so put car in the 2007 Calgary World of Wheels show. It was a lot of fun, also met a lot of great people and re-found some old friends. The judging stinks though IMHO, pretty much an old boys club as I was told it would be (even the guy I bought my carpet from - a complete stranger - told me if I didn't know anyone there I wouldn't win anything!), the car that got first in my class looked like a nice daily driver, some very obvious flaws without even looking hard (not putting the car down, but it is a competition). After the show I asked one of the judges to go over my car and see where he thought it fell short. He had a tough time finding anything wrong and told me as much, and I quote "Not much you could do to improve on it" which makes me wonder what criteria is needed to win first or second place? So I then had the head judge take a look and he pointed out a few things, NONE of which were on my judging sheet ..things like back of headlight bezels being rough chrome (which is correct-GM never finished the backside), burned exhaust ports (well hell the engine actually runs), couple areas could have been cleaned better/dusty (back of intake), etc.
It would seem since you have to pay to enter, pay to get power, and pay for your own carpet and stanchions etc that the least they could do is some fair judging. I had many people come up and tell me afterward I got robbed (including competitors). Whatever. I'm not saying my car should have placed better than it did (the restored groups are extremely competitive with excellent quality and large numbers of cars), but I'm sorry there is NO WAY the best in class winner should have been the car they picked.
The best part afterwards was watching the top place winners try to get their tops up, they had to tug and align to get pins in, the windows wouldn't go up on their own without help, etc. Made me laugh. Its been 16 years since I last showed my cars. Now I remember why. Real enthusiasts build the cars for themselves.
Show was long too, I put in about 12 hours each day for the four days (including move in) and averaged 5 hours of sleep a night.
There were some extremely nice cars in my area of "interest" though, 70 Judge, 68 Nova, 70 Hemi Cuda, 72 GS Hardtop, and others. And of course all the customs/trucks/rods which are excellent, some incredible works of art.
Public reaction was very positive. I had many funny and interesting questions such as "Is that a V8?"....."Are you single?" (yes it was a woman!!LOL)...."Is it for sale?".....Also one old gent gave me some good advice, he said "Don't ever sell it, one day when you get old like me and can't get it up any more, you can still take the car out and get your heart pumping!" :-)
Now I wait for summer and a nice clear day to go cruising.

Feb 26, 2007
Since the last entry on this page, just been trying to drive the car when I can. I never realized how bad the weather is here until I started driving a convertible :) I did manage to find some decent GS emblems for the inner door panels and one of the best moves I made was to order up a complete Gardner exhaust system. Finally it sounds like it should, still has nice tone at low speeds and idle but at 60 mph its very quiet, just tire and wind noise. Perfect. They build a fantastic system, everything labeled and well packaged, and it went together easily. Listen to it here.
Sept 28, 2009