
1972 GS Convertible Interior
Obviously a interior fire causes hell with everything, and the car needs everything
in the interior replaced...almost nothing was left when I purchased this machine.
The car originally had a saddle interior (brown) but I will be going black or possibly
sandalwood (very light tan). While sandalwood would be closer to original, black
is the obvious choice as I already have parts in this color, its easy to match, hides
dirt and goes with any color body. We'll see. I'm not a big fan of changing colors,
however its allowed in the rules as long as its an original color available for that
year.
Looks a lot worse than it is. The steering column was installed after the fire so the car could be moved around. The car still runs and drives, however the seat is a little uncomfortable!!! :-)
There is some warping of the upper dash area, however my bodyman figures it can be straightened. Luckily an interior fire does not generate the heat that an engine fire (with gasoline) would do. Most of the heat just goes out the top on a convertible. The previous owners had stripped a lot of interior parts off a hardtop parts car so I have cores of almost everything now except a rear seat and rear quarter interior panels.
Dec 15, 2000
Finally found a rear seat...it was sent all the way from North Carolina by a fellow aircraft mechanic (Thanks Dave!). Very ingenious to put the two pieces together, squish them down and tie them together with coat hangers in that position so they would just fit within the limits for UPS oversize packages. The shipping and import fees for this seat were twice what the seat itself cost. This is getting to be a very expensive hobby, especially here in Canada. You can see the seat in the following picture...note the different colors of all the interior pieces as I slowly accumulate the parts I need. They will all be recovered of course.
You can also see the front windshield trim has been discolored by the heat and will need to be replaced.

Feb 13, 2001
Have located the final interior panels needed for recovering, also found trim and marker light I needed.
May 23, 2001
Some of the interior panels I bought to recover happen to be sandalwood...they looked very nice on the orange when I installed them to test fit. I am now debating doing the interior in sandalwood instead of black so it matches the top (would be closer to the original saddle as well). We'll see..I do have a few years to decide. As for the top, the original color (covert) is no longer available anywhere, the sandalwood color is the closest match so far.
August 25, 2001
This car had the uncommon front seat shoulder belt setup (RPO option AK1). These bolted to the convertible top brackets (beside the rear seat!!), exit between the piston panel and the interior panel, then run forward up over the front seat. Strange setup. The original belts were - big surprise - burned up, but the ends are still attached to the top mounting brackets and caused me some confusion until the option list arrived from GM. I have never seen anything like this before, or even knew it existed.

Looking at the picture it appears the original belts were saddle in color to match the rest of the interior. Also, even though the belt itself is melted notice the lack of discoloration or heat damage on the bracket, this is good news as it appears fire was out fairly fast so no extenive damage to skins/structure. Really wish I knew the whole story on this. You can see the pin where the top cylinder mounts.
I found a company that reproduces these belts, and the belts just arrived today (they put new belts on my used buckles). They were expensive, but well worth it, hopefully they will never be needed...they have kits as well if needed so you could these to to your convertible if it didn't come with them.
The only GM documentation I have been able to find so far is this diagram:

This is slightly different than my car, which has the belt mounted to the front face of the convertible top bracket. Apparently, GM also used this setup on some hardtop cars, notably the 67 Camaro (option AS1 I believe). It was dropped on that car after one year as it was not a great option, you can imagine what eight feet of seatbelt was like to wrap up!!....of course, they went to the roof mounted belt in 68 but for convertibles there really isn't anywhere else you can mount the harness ( although I would have thought they could have developed something that stayed with the seat and picked up on the floor hardpoints).
Since my car is a 72, apparently they have a different style of buckle, the lap belt is a buckle/clip,
but the clip part has a slot cut out and the shoulder harness has a pin that engages
that slot, so there is no separate buckle for the shoulder harness as this diagram
shows. Also note on this GM diagram that they show the seatbelts bolted to the wrong
side of the tranny tunnel...I assume this was for clarity.
August 31, 2001
Finally found a picture of the front seat shoulder harness setup on a 1970 Buick convertible:

Sept 6,2001
Found a replacement in dash tach for the car.
Repros are available but the last one I had didn't impress
me, perhaps they have improved, as many repro things have. A few years ago I ordered
a set of the rear quarter window doorjamb seals, when they showed up I was mad as
they were not even close, basically half the seal was not molded on and mounting
was totally incorrect and they charged 30.00US for that? I just received my
new rear quarter window door jamb seals, ordered them only after seeing them
in a Chevelle catalog, and they are excellent.
Dec 22, 2003
Ordered seat covers and doorpanels from Legendary Interiors today. Ouch. Review will be up when they arrive (8 weeks or so). Was going to do sandalwood interior but parts were extremely hard to find (steering wheel especially) and its very hard to make all the parts match as they should (even GM couldn't do it ). Black is very hot on the backside in the sun with a ragtop so the final choice for the interior color is now.........1972 white! No changing now, its ordered and paid for.
Jan 28, 2004
Wow!!! That all I can say.....my interior parts have arrived from legendary and they are, quite frankly, awesome. The attention to detail is extremely good. The 1972 white is an off white, almost cream color, and will go excellent with the darker orange Buick painted this car. Everything was packaged very nicely, and arrived in two very sturdy boxes. My only complaint is the aft quarter interior panels were folded over and that created sharp wrinkles in the material. I am sure, however, that they will work their way out when I install them.
April 28, 2004
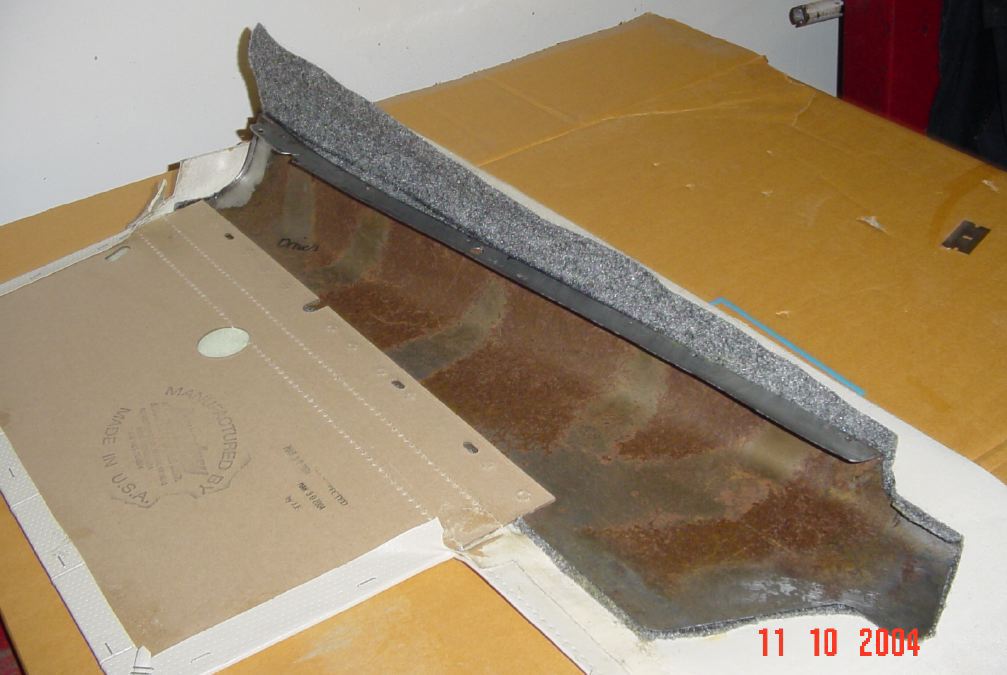
Started assembling my interior panels today. I didn't get very far as it turns out my can of contact cement has decide to turn rock hard on me. I did however get the aft inner panels attached to the metal framework. I am not aware of any pre-assembled interior panels for these cars, so you do the work yourself or get an interior shop to do it for you. Its isn't hard to do and I will try to post some tips to make it easier (thanks to Duane H for helping me out with advice on doing these!). You do this at your own risk!!!
Take care when pulling off the old door panels to not bend the metal pieces that run along the top. I use a thin scraper to peel the old boards off the metal piece once the vinyl has been peeled away. The panels are held in place by the tabs created when the metal panels get holes punched through them. Take a needle nose pliers and straighten these tabs so they are not bent over. Clean the metal parts. Make sure the edges of the metal are not sharp as you will be pulling vinyl over them.
Once you are happy with those, lay your panel out facing down on a sturdy piece of wood, and fold back the vinyl and padding as needed to get access. Support the parts as necessary so they lay flat. Lay the metal part down on top of the cardboard, line up the oval guide holes, and then pound the metal tabs into the cardboard using a hammer and some wood. You want to use a longer piece of wood as the metal is thin and you do not want to bend it.
If the panel does not want to stay in place, you can add rivets to help hold it on and give some extra strength. Good idea on the door panels since they are so large. Make sure you check where the panel is going to be mounted on the car so the rivet doesn't end up in the way of proper mounting, use a washer on the backside of the cardboard to spread the load, and make sure to grind the rivet head flush with the top of the metal panel before gluing the felt or foam down.

Close up of the guide holes. MAKE SURE these are aligned properly before you pound the two pieces together or your door panels will not be straight. Notice how the tangs have punctured the cardboard and the metal now lays flat on top. The foam will get glued to the metal after being trimmed to fit, the vinyl will get stretched over that and glued on the backside of the metal panel. This allows it to contract and expand as necessary. Notice the foam starts below the metal line and goes over the metal. If you don't do this you will get a line where the metal attaches.
This is a picture of the panel before trimming. The foam or felt is trimmed more or less flush with the edges of the metal, the vinyl stretched over that. The tough part is working the vinyl to get it around the curves and edges without any wrinkles, and holding it there while the contact cement dries. Notice I only cleaned where the glue will be applied. The rest is factory cement. Also notice that even though this is a power window car and the panels were ordered as such, the hole is for a crank window car. The factory power window switch mounts in the exact same location, just some minor trimming needed. The drivers door panel does have the rectangular hole cut for the four way power switch.

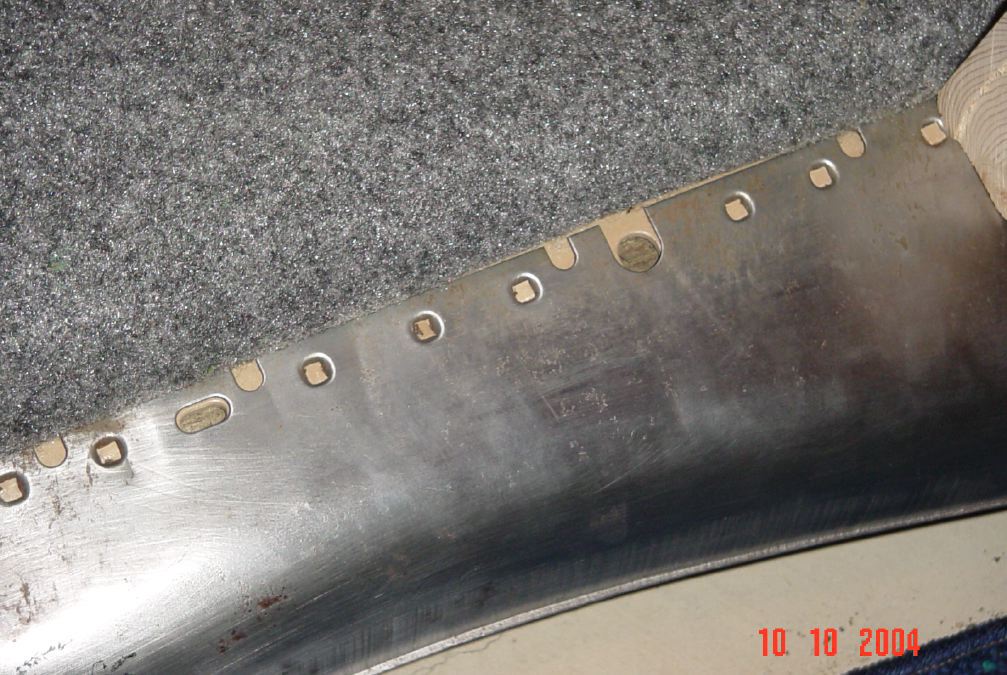
Oct 10, 2004
Ok, this is where things get ugly. Gluing on panels with contact cement rates up there with getting a tooth pulled, but the results are well worth it. First you need to glue the foam to the metal panel...I leave extra material on to grab while you wrap the foam over the metal part. Pull it tight and make sure you have no wrinkles. Contact cement you have one chance to get it right with foam.
Once the cement has had time to dry, I use a new razor blade to trim the foam to the inside edge of the metal lip. The vinyl goes over this and wraps down, and the inside window fuzzy will screw onto that edge, so you don't want foam to roll over the edge. You also don't want that top edge to be too high or you will never get the vinyl to lay flat. You can use the metal lip as the guide to cut the foam.

The next step is to glue the vinyl down. Due to time limitations with the contact cement, I did not get any pictures of this process. I used brush on contact cement on the backside of the metal, and on the vinyl. Don't use too much glue or it may peel off. Don't use the spray on glue as its not as strong. As that is drying, I spray a light coat of 3M sprayable contact cement on the last inch or so of the foam towards the edge (basically the same area as you see in the picture above, or the top edge of the foam). Don't use brushable glue on the foam or you may get lumps. Then I slowly and carefully worked the vinyl up and over the edge in the deepest part of the curve using my palm....once happy with that, I worked towards each end pulling the vinyl around to the backside where its gets glued to the metal. You need to watch for wrinkles and pull the material as required to remove them. Use heat as well which loosens the material up and lets you pull the wrinkles out easier. A helper is good too, although I did mine by myself.
The very front and aft ends are left for last. On mine, both times, after the above
steps were completed, I had some vertical wrinkles. Now I glue the front and aft
flaps, and heat the center area of the panel. By using heat and pulling very hard
as you wrap the ends around the metal, the wrinkles will pull out. This is why you
do not glue the whole foam area to the vinyl, only the top near the edge...it allows
the material to slide around and find its "happy spot". This picture of
the backside shows how I sliced and trimmed as required to get the material to fit
properly.

At the corners I duplicated what the factory did on my pieces. They basically folded the material as required to get it to fit. Every factory is different, and I'm sure no matter how you do it it will be better than original. I have seen many with seams showing, two or three folds of vinyl piled up on an edge, or crooked mountings, etc. I sliced a few places to help fit the vinyl, and the convertible part has more oddball shapes, if you are doing a hardtop, basically you would pull the vinyl in and down all around the back side and then fold it under. Always keep in mind where the other interior panels go so you know where to be picky and where you can hide edges or seams. Good idea to try all this out before you put the glue on too, with contact cement you get one shot...maybe two if you pull it off carefully enough.
Now the panels just need the weatherstripping installed, clips installed, and the
openings added for the power windows. The doors and the remaining interior panels
are easier, as there are no compound curves. Picture shows quick test fit on car,
looks good!!

Oct 12, 2004
Decided to test fit the rear interior area. Sometimes the interior can be ugly to work with so other than the just completed panels above all the parts are still wearing their old covers. I have a wicked cold right now too, so old panels are probably better just in case!!! :-) I did find some small issues, most notable being the rear lower seat didn't want to stay engaged in its latches....a quick inspection revealed the actual attach point of the seat frame to be bent out of shape. So after removing and tweaking the lower seat 100 billion times, it finally fits nice!!! Note the seat is actually from a 69, the correct pattern will match the door panels. GM used many interchangeable parts on the 68-72 A-bodies.
I also discovered that the small channel that bolts to the seat support and is used
for attaching the top boot sits about 4 inches left of center on the seat support.
The factory holes are still there, and that is where it was installed originally...naturally
I wanted to center it but due to the construction of the rear seat support having
this part centered would leave the very last LH hole with no place to put a mounting
screw in, so thats not good. I have put out some questions and will see if this is
a normal thing for these cars. Interesting. Since all these panels were sourced from
various cars, I ended up drilling new holes for almost all the mounting screws. It
took about five hours to set all these parts up to the point you see here. Next time
will be about 15 minutes, and all white.

Oct 12/13, 2004
Door panels have now been recovered as well, and look really good. I used four rivets on each door panel as well to help support it. The rivets go through the existing holes in the metal panel, through the cardboard (drill a hole) and then you pull the rivet with a small washer on the formed part so it supports the cardboard. I used 1/8" rivets, the head fits partway into the factory holes in the metal panel, this way you don't lose all the strength when you grind the head flush with the surrounding metal section (sorry, no pic of that). If you don't shave the rivet heads down flush, you will have bumps in the covering. Then you glue on the foam padding over the cardboard and metal, trim it to the edge and finally the vinyl gets wrapped and glued over everything like the smaller panels previously. Here is a picture of the backside of my drivers door panel to help explain. If you look real close you can see where the factory tangs in all the little holes are pushing up the cardboard. You can also see the foam padding that gets glued down and the pre-punched sections you can remove depending on options you have.

Attaching the glass sweepers (or "fuzzies") is easy on the doors, they
just screw into the factory holes already there from the last set. Hopefully they
line up. The ones on the inner panels take some more work, but what I do is lay the
panel out flat and lay the weatherstripping on it. Locate where you want to put the
first attachment screw (the old fuzzies were held on with staples), make sure the
sweeper is lined up nice, and drill one 1/16" hole through both the sweeper
and the panel itself (I put the screws right in the middle of the weatherstripping
height-wise). Remove the sweeper and drill through that hole again but this time
with a 3/32 drill bit. Now you can lay it back down and run the screw through the
weatherstripping and into the panel. If you don't enlarge the hole in the weatherstripping,
the screw will thread that as well and the sweeper won't clamp down properly onto
the panel. Now drill the next hole 1/16" again. Change that to 3/32 and drill
though the weatherstripping ONLY without removing it, you will feel as it penetrates
(use a cordless drill). Now you can run that screw in too, but don't tighten all
the way up. Keep doing that until they are all in, then remove and clean up all the
debris, and finally run all the screws back in tight.
I use the alignment holes in the cardboard and metal panel to line up the screws
on the door panels...one in the center, one by each slot, then one in between those
two and one about 1" in from each end. Even though nobody should see them when
installed, its good to keep them equally spaced to help distribute any loads they
might see. The quarter panels I used 4 screws equally spaced.

Once the door lock ferrule, power window switch brackets, and driver mirror plate are installed, the panels are done!

Some good visual progress. smokin!

Oct 15, 2004
Edited page (removed some unnecessary pictures/info and added others).
Oct 19, 2004
More test fitting. Its important to make sure all the major pieces will fit properly before you have them rechromed, dyed, painted, etc. This shot shows the dash area partially assembled. Note different colors of parts, that will all be corrected later once fitting is complete. White interior cars of this era got black dash and carpet, with white seats and door panels. Wire hanging on rear view mirror is for map light. Dash bezel is for testing only.

Oct 20, 2004
Been a while since I have worked on the car or updated anything. It is a hobby after all and when its no fun anymore I stop until I feel like working on it again.
The heater box for this car was trashed. I ended up using one off another car, thankfully these are very easy to find. It was cosmetically rough though so it needed some work. This one didn't have much of the black coating left on it and actually was better shape than it looks. Look for easy moving doors, no dents, and unstripped screw holes.

And here is the same box after being stripped down, sandblasted and repainted. Looks much better. Also, all the foam on the interior doors was replaced with the exception of the defrost door which was still in very good shape. The foam pads came in a kit I ordered (which was basically a waste of money). It makes quite difference though, the doors close solidly yet quietly and will seal properly. You could just buy foam locally and make up your own pieces as required. They are a bitch to install though, contact cement gets everywhere!!! Note rough texture as per original, although it has a bit too much gloss.

As it is now with heater core installed. Heater core is new. DO NOT use your original, heater cores are cheap and nothing worse than putting everything back together and having to rip it all apart again after it leaks and soaks all your new carpet in anit-freeze!!! Don't cheap out on hard to replace (once assembled) items. Same for heater fan.
One interesting thing...if you look at this picture, you can see the hole on the LH side about 3/4 of the way up where it looks like there should be a stud. Some cars had a screw here from the inside through the firewall, but it appears the Flint built cars (like mine) did not have this screw. Also, several people have suggested when re-installing this assembly to put the screw there whether you had it or not, and then leave the lower outboard stud without a nut when attaching the firewall plenum. This way you can reach all the nuts on the forward side of the firewall, undo the screw and then pull the heater box off if you need to. Otherwise, getting at that outboard lower nut requires removing fenderwell or cutting a hole through it.
Note there is a large piece of sealing foam that goes over the heater core tubes that is not installed in this picture, and that studs will need paint removed off them.

March 14, 2005
Rear quarter glass is also being replaced with new. I will do a review on the glass once I test fit everything. I had to transfer all the brackets and parts over, so they were beadblasted to remove corrosion and repainted. Sharp eyed readers will see the attaching washers are silver but were originally black oxide coated. This was done as I painted the large brackets with rust protection silver paint just as a precationary measure, and decided to do all the washers at the same time. Nobody will see any of this anway, its strictly a functional thing. I also did not pay the extra $50.00 per window to have the proper date code etched in, the glass has been replaced and the restoration is not correct enough to warrant spending the money.
Do not paint in the tracks where the power regulator roller rides.
Note that the lower and forward roller have been replaced with new GM. The roller in the middle is part of the plate assembly itself, and is rivited on. I'm sure you could could replace it somehow if you had to, but why when they are good shape? The lower one is critical though as it pivots on a ball end and moves as the window travels in its track, old ones are usually stiff and cause restrictions and load up which is not cool with power windows.
Also, I noticed that the ragtop window lower rollers had TWO spacer washers under the lower roller metal washer. This effectively shims the window in at the top somewhat, not sure if this is a convertible only thing since my spare hardtop windows only have one plastic shim.

March 14,2005
Trying to take care of the many small details before the car goes in for its final paint. Dash is painted...first try had a reaction to orginal paint for some reason so had to sand entire dash to the metal and then prime and re-spray. Not nice! Second try turned out excellent. Top of dash is masked off as it is flat black while the interior portion is semi-gloss black. Steering column is for moving around the shop only, good column will go in once car is painted. Don't worry about the carpet, its for my knees, not the car!! Paint drys fast so any overspray ends up as dust. Defrost duct and heater plenum installed.

Oct 8, 2005
With the car getting close to completion, time to finish up the interior details. I had planned to recover the rear seat by myself using the good foam from a hardtop seat but that plan fell apart so now looking for a shop to do the foamwork. I can recover these myself, but the foam I am unfamiliar with and I do want decent seats in this thing. With the money spent on the interior parts, don't want to start experimenting now. We'll see how that goes. I did look at buying new foam for everything but nobody makes it for the notchback bench seat or the rear seat that I can find (so far).
I did break down the front seat though, and dyed the remaining plastic parts. I have tried to find these parts in white for the last year or two but have had no luck at all. I dyed the saddle colored ones I have as a temporary measure. These parts rub on the cushions and will eventually wear off the dye. The really frustrating part about all this is the last can of dye I bought was a perfect match to my interior color, this can wasn't very close so may have to re-do them all again.

April 18, 2006
Well I broke down and took my seats to a local shop to have them recovered. This kinda hurts as I pride myself in doing as much of the work as possible on my projects, but looking at the foam and supplies plus the tools required to do what I want with these seats, not to mention the time (and space!) , its just easier to have it farmed out. I did find another can of SEM dye, and redid the parts in the above pictures...funny, this can was closer but not as good as the first one. Tried several times to have color matched but they were no closer than the pre-mixed stuff. Even dying these parts is a pain with the cleaners and preps you have to use. Its gonna be authentic GM all right, nothing is going to perfectly match!!!LOL
April 28, 2006
Rear seat is in. Looks, feels and fits great. I did have some issues with this installation. My car was equipped with the optional rear seat retracting belts and I had planned to use these. However, the replacement seat I bought and had recovered was a 69 seat. Basically the same, the 72 was modified however both for the fuel vapour system mounted behind the rear seat (not a big deal) and also had small "notches" on the outboard aft ends of the lower seat frame for the retractable belt reel and guide. I did not notice this last one until the seat was recovered so the reels do not fit. The one part I didn't test fit and I got nailed!!! You learn something new every day.
Backup plan is easy, just bolt in the regular (non retracting) belts which leads to another problem...I don't have enough male belts for the car!!! Adding to this is the fact that the deluxe belts were not that common so now the search is on...in 72 GM went with the RCF-67 small buckle belts as well and it could be a while before I find any. If I can locate a 71/72 rear seat I could also transfer everything over to the new frames, so looking for those too. Until then, I have eliminated the center seat belts for both the front and rear seats...this frees up two male belts to replace the retractables, and very rarely do I have rear seat passengers anyway. So until I can find the parts the car is now a four passenger machine.
One other item is how GM finished (or did not finish!) the top area of the seat. The side panels do a 90 degree bend and are screwed to the rear seat support. The vinyl ends about 1" inboard of the bend (as per original). The top well bag goes up and over the rear seat support and then down behind the seat cushion, but no matter how you try to integrate it all there will be seams and it just looks unfinished. Also, seat sits off the seat support slightly . Trying to figure something out that is not obvious, makes it look more finished, and looks stock. Thinking spare white vinyl with a foam backing so it can conform to the seat cushion and seat support, folded over the seat support to keep it all tied together. We'll see.

Got lucky and found some extra belts through a friend, they were really decent shape so good clean and some paint and rear seatbelt configuration is complete. These are RCF-67 belts and it seems only Buick and Olds used this style from what I can find, and only for a couple years...usually the RCF-67 belts are this size buckle but are the brushed stainless style. If you have any details on this please get in touch. Someday will update the lower seatframe too and get the proper retracting belts in there! Also note the front seat shoulder belts have not been installed yet, this is still a test fit phase.

Hopefully some of the info here helps a few people out, as other websites/people have done for me. This page is now completed as any more details will go to the final assembly page (including front seat).
Completed June 16, 2006