
Front Dash Speaker Mod
The 70-72 Buick GS, like most of its peers, had a very archaic sound system. Most only had an AM radio with one 4x10 speaker in the center of the dash. Some, like my Stage 1, actually had a fader control and another 6 x 9 in the rear package shelf. A few had AM/FM radios and even less had the 8 track tape player. If you want to upgrade the sound system, yet don't want to modify anything (you wouldn't cut your car up, would you????), it can be a challenge.
The rear package tray is made for two 6x9's, so that is not a problem, they can be hidden easily under the rear package shelf. You can mount your cd receiver in the factory dash opening, or in the cubby hole, or under the front seat if you wish to hide it and leave the factory radio in place. I bought a cd receiver with a wireless remote so I could use that to control it, yet keep the unit hidden. Also I burn my own cd's so there isn't much need to skip around, as only the stuff I want ends up on the cd. The front speaker is the problem. There is only one and without cutting up the internals of the car (which I refuse to do) there isn't a great way to mount a speaker there. You could use one 4 x10 speaker, but I found there are only a couple available in that size, and all have the tweeter mounted much higher than the edge of the speaker, so how do you mount it without the tweeter rattling on the dash itself? This is made worse by having an a/c car, as the middle vent duct runs right under the front speaker area. These cars had no provisions for door or kickpanel speakers.
This is how I solved it on my car. You can buy these premade but with our exchange rate and the crazy prices they charge, it was cheaper just to do it myself. Besides, I have no idea what kind of speakers they use in the premade system. Here is the factory speaker before the mod ( this speaker was already trashed before I did this ):
Basically you just pull off the rubber surround to the factory speaker, release
the factory mounting system by bending the tangs, cut out the paper woofer, knock
the magnet out of the center (behind the tin tape), cut the metal base so the new speakers will fit, drill
speaker mounting holes and install. The you put it back together and put the rubber surround
back on and bolt it back into the car. The rubber surround is important as it "loads
up" the assembly once installed and keeps it from rattling. Go slow when removing
so as not to tear it.
Things to watch for are the edges, you don't want to cut right to the edge or the
speaker housing will lose it strength. A little metal left here leaves a "L"
shaped beam, which is quite strong. Once trimmed, you need to bang the curved metal
pieces near the inboard ends flat to mount the speakers level before drilling the
mounting holes. After that, put it top down on a level surface and adjust as required.
Its kind of flimsy, but the speakers give it strength once bolted up (thats why I
removed the factory mounting piece, it allowed me to mount the speaker bottom in
the vice as required, then simply reinstall the mounting bracket after). Here is
the speaker ready for the new parts. You can see where the small magnet was in the
center, just knock it out with a punch and hammer. I trimmed this speaker using a
die grinder.You can also see where the inboard ends were pounded down slightly to
give a level surface for the speaker mounting.

Also, you want to make sure that the speakers you buy will fit. I bought the Polk
EX402a's for a couple of reasons. First, they are good speakers and responsive (91db)
so would work well with my cd receiver. Second, the tweeter did not stick up much
past the outside surface of the speaker (this thing has to sit lower than the original
speaker top edge, remember). Third, Polk had pictures of their speakers online with
dimensions...from this I determined that they would fit nicely, and finally, these
speakers have break away tangs for mounting so you can drop one tang so the speaker
will fit perfectly into the factory speaker, which has one rounded corner on each
end.
If you decide to use other speakers, make sure you measure
them first!! There was about 3/16" clearance between the bottom of these speakers
and my middle a/c vent duct. These speakers were mounted on the top side of the old
speaker, and had about 1/16" clearance between the tweeter and the bottom of
my dash.
Anyway, I couldn't save the fabric on my rubber surround (it crumpled to dust when
removing), so if you look down my vent you can see the speakers, but only if you
know what to look for. Painted the factory speaker before mounting the new ones,
so almost everything is black. I think the fabric may have caused problems with the sound
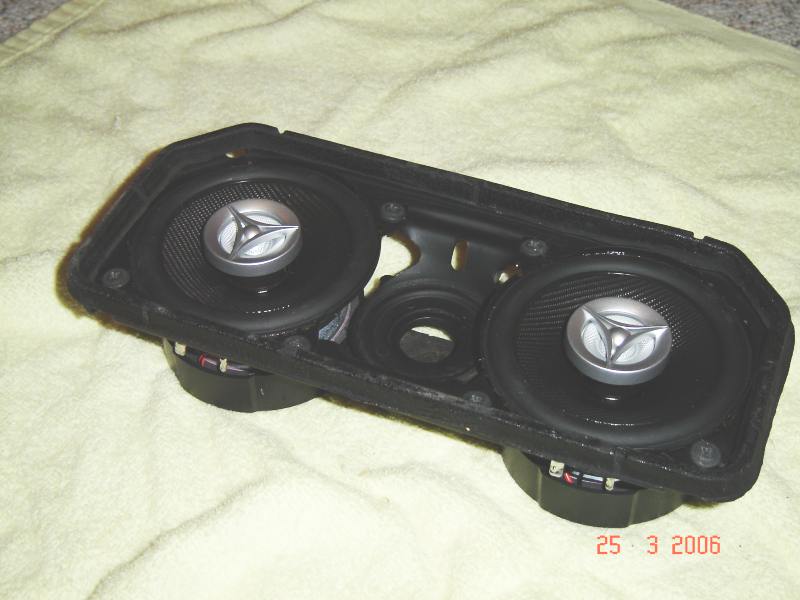
anyway. Here is the assembly completed with the rubber surround back in
place.
The whole thing start to finish took me four hours, and that includes pulling my
car apart and hookup. They don't pound due to their size but when combined with the 6x9's in the back, the sound is
very nice and crisp and really adds to the overall quality.
Dec 2001
Article updated March 25, 2006 with new pictures. These now show the JBL GTO 426 speakers I used in the convertible speaker (I couldn't locate the Polk ones locally this time). The 4" JBL work good, however the magnets are huge on these things so you need to be careful to make sure everything will clear, including the factory mounting system. These will NOT work on an a/c car as the center duct would be in the way.