
1972 GS Convertible Body
Pleasantly surprised today upon disassembly of the front clip on the car...the passenger side fenderwell and rad support are not rusted out like usual (sitting under a battery for 30 years will do that to you)...indeed the original paint on the fenderwell is almost usable with just a polish....
Also interesting to see the original paint on the cowl area that hides under the
fenders...this is a very hidden area so the paint does not fade and if the car was
repainted (as mine was) this area is almost always untouched. The original flame
orange is almost a rusty color, yet very bright.
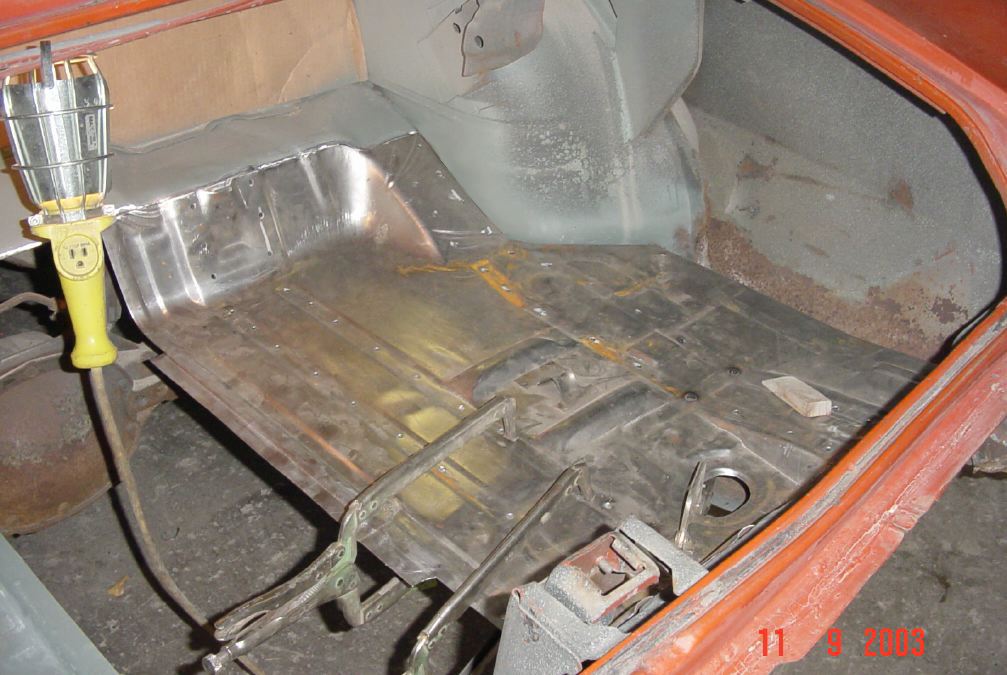
Found a huge wasp nest inside the heater box...good thing they're gone!! The fan
was completely melted from the heat (check out the picture below). The original sealant
GM used on all the seams is rock hard and falling off, so that will all be replaced
as well. It should be replaced anyway, since it helps absorb NVH and also keeps out
water.
January 31, 2001
In the picture below you can see the upper windshield trim (taped on) which I bought from a guy in the States...unfortunately the post office had their way with the package and managed to bend the trim and break several other items inside. It really bites when I finally find a piece, set up the deal and pay for it, only to have it damaged in transit by someone's incompetence. It survived 30 years on the front of a car, only to get smashed by the post office! Luckily, this is a fairly uncommon occurrence. It *might* be salvageable.

February 13, 2001
While I was looking for one piece of the top assembly, I ended up buying a complete top assembly minus the front header. This works well as my front header is good, but the side rails have heat damage and are twisted up somewhat (they had retracted the top with power after the fire...it also had lots of wear). I wasn't too worried about the top at this point, but the price was right so I decided to buy it. Tracking the parcels progress online, the top frame is in Winnipeg right now, clearing customs.
I installed and checked all the hardware that goes on front windshield frame (hook
receptacles, mirror, visor supports, etc). Everything works good, retains top firmly
and lines up nice so will remove and put away again. Pulled off the door hinges,
as they are worn . They will be beadblasted and rebuilt, then reinstalled. Rear bumper
removed. It will be rechromed sometime in the future. Not a priority at this point,
but removal needed to gain access to sheetmetal.
February 22, 2001
Door hinges have been beadblasted, taken apart, bushings replaced (with GM parts) and then reassembled. GM originally bolted the hinges onto the car and the door as bare metal with sealant between the surfaces, then painted the car. I have painted the door hinges and hinge mount areas black as primer and protection against corrosion. They will of course be painted body color but right now its important that I get the doors mounted so the hinges can be installed and aligned into their final position. Then the doors will be removed again, the jambs, hinges and rest of the main body will be prepped and painted. Doors will be painted while off the car as well. This way there is no seam in the doorjamb when you open the door.
The body mounting bolts came out pretty easy. I've been spraying them with lube for
two months though, so they should! I might have to build some kind of dolly assembly
to hold the body, perhaps could use a hardtop frame to roll it around on while I
detail the convertible frame. We'll see.
Convertible top frame assembly arrived, looks pretty good. It will be disassembled,
beadblasted, repainted and reassembled with new hardware and bushings. Any hardware
not replaced will be replated. Seats have been removed, old top frame assembly has
been removed, rain gutter, trim weatherstripping and most other pieces have been
removed as well. They will be restored as finances permit (that is the limiting factor
right now).
last updated March 2, 2001
Installed drivers side door. It
took some effort to get the door lined up along rocker and rear quarter, keep the
gaps nice, and then tighten the hinges down (I installed it by myself). Once installed,
I then removed all the glass, hardware, weatherstripping since it is easier to work
on once mounted, and the alignment of the door depends on the total weight. If adjusted
while empty, once all the glass and hardware is installed, the alignment could be
off. The alignment of the doors is critical, since the fenders will be lined up to
the door front edge so that will set the gaps on the hood as well. I try to make
everything as even and tight as possible, its always easier to open up a gap than
close it. The doorhandle is left on to make it easier to move the door as required
when installing.


A problem with restoring a car
like this is where to draw the line. The fit and finish on these cars was indifferent
so you can spend a lot of time and money making the car better than the factory ever
did. This is not necessarily correct, and often not even possible without major surgery.
I've restored several of these cars and parted out many more, and the range of tolerances
is amazing!!LOL Don't forget these cars were built 30 years ago, people had different
priorities, outlooks, and technology. You can't compare them to new cars, simple
as that. Love them for what they are, fun and different (when was the last time you
saw a orange Buick convertible with hood scoops??LOL). If I put this car together
just like GM did, most people at a show would think I had simply done a poor job
of restoring it!!
Also found some rust on floor along a body seam. Looks like I'll be replacing a floor panel after all. Will be having my long time bodyman friend look at the car next time he passes through. If the bodywork gets out of control, the project may be canceled. Not likely, but possible if we find more hidden problems.
March 15, 2001
Some sheetmetal panels have been delivered to bodyshop for metalwork. Fuel tank and fuel/vapour separator removed in preparation for body removal...was very excited to find the broadcast sheet on top of the fuel tank, then totally disappointed to discover it was for a hardtop, and the VIN # was one digit off mine...just my luck. I mentioned this on the Buick mailing list and it turns out it has happened to several other people...guess GM didn't really care since it was never intended to be used for anything anyway. Best one I heard was a documented 1972 GS Stage 1 that was built twice, same colors, options and same VIN number!! Explain that to the DMV...!
Not much else new, just trying
to figure out best way to lift body off chassis and figure out some sort of cradle
that I can make that won't be too expensive since it will most likely only get used
once. I have been busy building the engine for the Stage 1 (and working on the house)
so that has taken most of my spare time for the last little while. The engine for
the Stage 1 just needs to be installed now.
May 23, 2001
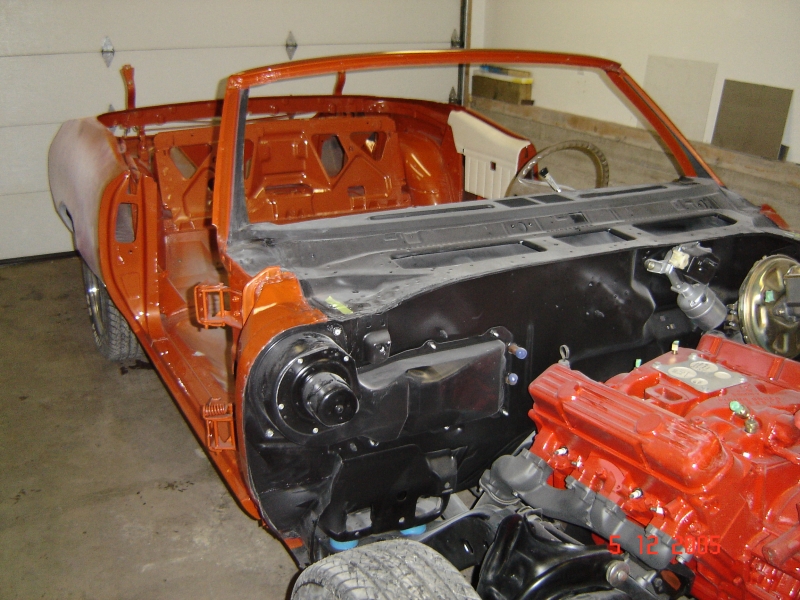
Spent a few hours removing all the parts off the firewall. There is a structural support that ties the brake booster, bottom of the dash, brake pedal assembly and the steering column together that needed to be removed as the nylon bushing for the brake pedal melted. It still worked, but was not smooth at all. This piece bolts to the mentioned parts so is easy to replace (yeah, maybe if it wasn't burned and rusted and dirty). You can see from the picture below that it is toast (literally!!), note the pedal standing upright (binding) and the burned underdash insulation. The replacement piece is on the RH side of the picture. Also note the pin that connects the brake pedal arm to the booster fork, it was tough to remove as it rusted into place, and was bent (and I made it worse removing it). Doesn't matter since new parts will be installed.

May 27, 2001
My bodyman has apparently decided to make a career change (I have not been able to talk to him in person yet). I wish him all the best, but that kind of leaves me in a quandary..now I have to find a shop I can trust to do all the metalwork on this car. Its not easy, if the car gets hacked, that's it....good bodywork is an art form, but just like any art, it's open to interpretation!!!!LOL
August 20, 2001
Discussed this project with my bodyman today, we are still on track. He just wanted to try something different for a while, I can certainly understand that. That makes me feel better as I trust his judgment and his skills, I want this car done right. I still need to find a painter, but for now at least the metalwork will be done properly.
August 31, 2001
I've had a chance to look at one other A-body
convertible of this vintage, and it had the same problem.
Also, the center of the windshield was measured
and found to be the correct size top to bottom. We're thinking perhaps the tooling was getting worn by the
time this car was produced and/or it was bad assembly at the factory. Its certainly
not uncommon and its not bad enough to worry about (one of my parts cars had a console
in it, the factory welds on the attaching bracket had actually blown a hole through
the floorpan of the car..that is, the welds that actually hit the bracket!!!!LOL).
Quality control has come a long way.
The car looks excellent with the windshield in
it (it was missing when I bought the car), little bit of a preview to the finished
product. Also tweaked and painted the dash area, installed trim as test fit and just to make myself feel better. Here are a
couple of pics with the windshield and trim installed:


Don't expect anything too exciting here in the near future. Due to the recent events
at the World Trade Center and the looming Middle East war the future of commercial
aviation travel (and thus my job) is uncertain. There is lots of work to do that
does not require money, however, and I will concentrate on that for now. This website
is about cars, not politics or religion, but you really have to wonder what the hell
is wrong with some people....
Sept 30/2001
Slowly getting the sheetmetal needed to assemble the car. It is expensive stuff, but there is no substitute for replacing damaged metal. I went with a LH rear quarter from Rolling Steel Body Parts, they seem to be one of the best for quality after talking to many others. NOS is simply getting too expensive, and since convertible quarters are nonexistent, I would have to cut up a NOS hardtop quarter which would be a real waste.
You can check out details on my repro parts page.
June 16, 2002
WOW!! After some 1.5 years of looking, I finally found a decent passenger side door for the car locally. I actually found it at a auto recycling yard.....at first it looked really bad, but as I looked at it more and more I realized that it was just the paint falling off from bad prep....the door had actually been reskinned at one time so the bodyline was excellent. I confirmed this by wiping it down with a pre moistened cleaning towel (I always carry these to clean up, as they don't need water) which gives it some gloss so you can check for damage etc. The body line on these cars is so subtle, it is almost impossible to repair damaged areas properly. Other then rear quarters, reproduction sheetmetal is non existent for these cars.

I will have to cut out the hole for the factory power windows. Also the car this door came off had the upper peak moldings so all those holes will have to be welded up as well. Other then that, the door looks good. Test fit ok, no major problems, just the usual attempt to fix the factory specs on the car by closing up door gaps ...smaller gaps makes the flaws more obvious. Note the markings and the tag on the firewall, these have been documented will all be replaced.
It all sounds so easy, but I drove 2.5 hours each way to
get to this yard on a tip by a local guy (thanks Clint!), spent some four hours trampling
through three foot high weeds (the Buick area doesn't see much traffic) and pools
of standing water and mud searching out parts, mosquitoes everywhere (West Nile Virus
hopefully hasn't made it this far yet or I could be in trouble), it was 32 degrees
Celsius (90 degrees f) outside and I damn near died of heart failure when a HUGE
spider who was obviously upset at my intrusion hit me on the side of the head as
the web fell apart....it was like being hit by a soft walnut and I'm sure my antics
would have made the "Worlds funniest videos" had it been taped. I've never
moved that fast before in my life!!!!! Once
the door was off, I had to carry it all the way Back to the front desk (one mile??two??)
along with my toolbox and a few other odds and ends I found. I'm not sure how heavy
these doors are, but my arms still ache (I seem to recall they are about 90 pounds). But I got a straight,
rust free door. Awesome!
Aug 27, 2002
I finally found a bodyshop that seems to do real quality work. Most bodyshops seem to prefer collision work (I suppose quick turn around on jobs and dealing with insurance companies is fairly safe and easy money) over restoration work. This shop specializes in restorations and hot rods and the owner is very knowledgeable, also he took the time to discuss my project, showed me around the shop, Showed me pictures of sheetmetal repairs on a car and then I saw that same car which had just come out of the paint booth. The fact it was a 66 Hemi car (very rare and extremely valuable) and looked incredible made me feel much better.
My GS is booked for November and will most likely be there for 3 or 4 months. Only
the basic metalwork will be done at this time, no paint until I bring the car home
and can test fit everything (interior, bumpers, trim, etc)...once happy, it will
again be taken apart for final prep and paint (probably next winter with a little
luck). This ensures no nasty surprises when final assembly (painted) takes place.
This was brought about by my usual bodyman not having the time to take on this project.
As a friend, he was going to do the car for about half what the usual shop rate is,
so I will be paying a lot more for bodywork than planned. At this point, I have two
choices...one is to simply drag the project out a few more years to help pay for
it, the other is to simply not do a complete frame off until some later date. We'll
see how it goes.
Sept 26, 2002
With the passing of my father, the weather, holidays, and work interrupting my plans, we finally have a date set for the delivery of my convertible for sheetmetal work. It is in early February 2003...stay tuned, should be some interesting stuff here soon.....
Jan 28, 2003
Finally!! Car is at the shop for basic sheetmetal work. Fenders, hood and rad support to follow. Here it is being loaded onto the flat deck for the trip.

Feb 11.2003
It has been 5 months since the last update, there were several delays but metalwork has finally started on the car, and it is very nice to see some progress. Note in the picture that, as usual, you find more than you planned for once you start. Floorpans are done, the car required two aft sections, the whole under rear seat floorpan, and I had one of the rear quarter braces replaced as well. There was some corrosion behind the seat support panel, and that was replaced with a section cut from a parts car. They did a very nice job, matching the factory seams, edges and spotwelds where you can see them from below the car. This is where the money goes. Note the brackets, tabs, seatbelt anchors that needed to be transferred over. Also note they stacked the panels properly with the edges inserted as original....this all takes more work (and money) but if you're gonna do it, do it right.
Also note the crossbraces welded to the quarters and then to each
other...this keeps the car aligned when you remove the floors and braces as the convertible
does not have a roof to support the body.....any misalignments created by movement
while welding in new panels would be almost impossible to correct later.

July 10, 2003
It is taking a little longer than planned for the bodywork, but that
is ok as it allows me time to prep other pieces for final assembly, and for my bank
account to recover from the payments. Good work costs money. Here you can see one half of the
trunk floor being fitted for final installation, and the other picture shows
the braces underneath which have been epoxy primed after being sandblasted
and checked for rust and/or damage. They were fine. Once finished, the car should
last a long time, much longer than GM ever planned.
Note the trunk floor has been trimmed to fit without too much extra,
this allows the outer edges to be removed getting rid of most of the wrinkles in
the reproduction floor. The car is starting to look good again. General
plan now is for quarters, then car goes on rotisserie so the bottom can be inspected,
any problems corrected, and then painted. At the same time I will be getting the
frame ready and hopefully will have it there when the body is ready bolt back on.

Sept 15, 2003
Trunk floor is in. Final prep has not been completed yet.

Oct 10, 2003
The back seat support front panel is now installed. This was removed
(by myself) as it had some corrosion on the lower edge....there is a gap at the lower
area behind this panel which had filled up with debri and held water which led to
the corrosion. This is a common problem on these cars so if
you are looking to buy an A-body, keep this in mind. No doubt
most of this was caused by sitting outside with no top! Note
welding was done by putting all the welds back in the factory spots.

OK, time to install the repro quarter. The rust wasn't too bad on
the exterior, but if you were to repair it, by the time you
had finished you would be spending the same amount of money as buying a new panel
(there are no patch panels for these cars, so you would end up getting a full quarter
and cutting off what you need) plus would have more bodywork and filler on the car
when done. It was decided to replace the whole quarter.
But first you need to make sure everything under the quarter is good. My car had some minor rust on the bottom of the trunk extension, aft lower corner of the outer wheelhouse, and the lip of the outer wheelhouse. Guess what? None of these parts are available aftermarket (surprise!) so they had to make and install panels as needed. This drives the cost way up but is the price you pay for driving something unique.
Close up of repaired area. Note the home made panel has the proper
hole with a slot in a recessed area for the factory drain plug, and the proper strengthening
ribs. Once the welds are ground down, the whole inside area will get media blasted
and epoxy primer coated prior to installing the quarter. You will never be able to
tell it was done. Also note all this work is going into an area you will never see
without a flashlight and mirror. It looks bad in the pics, but actually this is pretty
minor stuff for a 30 year old convertible unless you live in the desert.
This is why I didn't do more of the welding and metalwork myself.
I don't have the tools, or enough practice to know I could do all this properly,
and I don't want to risk butchering a rare car. If I could
simply buy and install the panels I needed, I would have done more on my own.

Test fitting the quarter. It too will be welded in in using all the
factory spots except for the outer perimeter near the top and front. The shop was
impressed with the Tabco/Rolling Steel quarter as it seemed thicker than most of
the reproductions they have used. Also, as discussed on my reproduction parts page,
the body lines seem quite faithful.

Somebody sent me an e-mail and was asking why I would post all this
as once the car is done, if I ever decided to sell it the buyer would know exactly
what was done to the car. Well I ask what is wrong with that? Yes the car has had
major surgery and yes it will probably have a small amount of filler but these pictures
also show the work is being done right, and by professionals. I am putting all this
up to hopefully help out my fellow hobbyists (Buick guys in particular who, like
me, suffer from a lack of repro parts), and to show people how much work it takes
to properly do a car.
I am building this car for myself. Period. I have no intentions
of selling it. And if I do, I have even more pictures to show a prospective buyers
as I think honesty is the proper way.
Nov 27, 2003
Here is an interesting little tidbit for you resto guys! In 1972, there were 645 GS 350 convertibles like mine, 126 GS 455 convertibles, and 81 GS 455 Stage 1 convertibles. That makes total 1972 GS convertible production 852 cars. Of those, 131 were flame orange, which is more than I would have expected, and makes it the most popular color. Here is how all the 72 GS convertibles break down:
| NUMBER PRODUCED | COLOR | SALES CODE | DATA PLATE CODE |
| 131 | Flame Orange | Z | 65 |
| 113 | Burnished Copper | M | 63 |
| 101 | Fire Red | R | 75 |
| 87 | Sunburst Yellow | Y | 56 |
| 76 | Stratomist Blue | B | 26 |
| 59 | Hunter Green | I | 48 |
| 47 | Seamist Green | F | 43 |
| 40 | Arctic White | C | 11 |
| 40 | Antique Gold | U | 57 |
| 38 | Heritage Green | H | 36 |
| 33 | Cortez Gold | Q | 53 |
| 30 | Sandalwood | J | 50 |
| 11 | Silver Mist | V | 14 |
| 10 | Regal Black | A | 19 |
| 10 | Cascade Blue | T | 24 |
| 10 | Crystal Blue | D | 21 |
| 5 | Deep Chestnut | K | 67 |
| 4 | Vintage Red | X | 73 |
| 2 | Nutmeg | N | 69 |
| 2 | Royal Blue | E | 28 |
| 2 | Unknown, Special Order | SCO | SCO |
| 1 | Emerald Mist | G | 45 |
Thanks to Marco for the info (and the Stage 1 registry as mentioned on my homepage)!
Nov 29, 2003
The reproduction quarter is installed and looks good. The upper bodyline
required some massaging as convertibles are different than hardtops. At this point,
there has been no bodywork as such, the quarter was welded on, welds ground off,
and epoxy primer put on to protect it. If you look real close at the following picture
you can see the weld in the upper forward edge....high solids primer or a light skim
of filler will finish it off before paint. Only way to get a better installation
would be convertible NOS quarters which are non existent for these cars.
The binder has a diagram of every separate panel on the car, with
my notes, thoughts, and what needs to be done. This helps answer a lot of questions
that come up over the course of a project like this, and is for the bodyshop as much
as for myself. It is easy once you get going on a project like this to forget something
until its too late. Anything I noticed on the car in the two years before it went
into the shop was written down.

This picture was taken without a flash to highlight the bodylines. The light was not great as there is a car over mine on the lift but you can plainly see the slight concave surface of the upper quarter. These cars are very subtle.....
General shot of the car. Doors have been removed and will be stripped to bare metal, inspected, repaired as required then primed and put back on car. Then fenders, rad support and hood will be installed and alignment checked for problems before being disassembled so the body can be removed from the frame. Planning mid January 2004 for that.

Dec 11, 2003
Over the holidays the quarters were block sanded once and the doors were prepped. The front fenders (as of yet untouched), rad support and doors were installed to check alignment and for any major problems. None found. The car will again be disassembled and the body lifted from the frame. New mounts under the main body may change the alignment which will be checked carefully after mating the body back to the frame.
After mating with the frame, I will bring the car home in primer,
do test fitting of the major exterior parts, build the interior, get the major drivetrain
in and final check of alignment and gaps. By that time, winter 2004 will be probably
be here and the car will go back for paint. Notice in the picture below, the original
paint of the fender is showing through the white, and its....orange!!! Must be fate.

Jan 8, 2004
Well as usual, life is what happens while you are busy planning!! Family medical problem forced delay of body/frame separation by several months. Anyway, today we lifted the body off the frame, and it was good. The frame is in good shape, not much pitting, better than I figured overall. Found the VIN stamped under the drivers door area and it matches, of course, but cool to see. Bottom of car looks good too, no rot in body mount areas (common problem). Removed remaining fuel and emission lines (can only access with body off). Frame comes home on the 19th for disassembly, blasting, powdercoating, and reassembly.
I had originally planned on taking body off myself, but its already at the shop and
its so easy to do with a lift anyway. Also, the plan has changed somewhat since the
car has been test fitted already with bumpers, etc, I may have it painted before
bringing it home and then finish up over the winter. Basically, it depends on the
$$$ situation. I think paint would be a great motivator, though.
Note the boxing of the frame that was done for convertibles. Pretty solid piece.
Going to make it tough to sandblast out the inside for the powdercoating...

March 17, 2004
Body is on rotisserie. Before the bottom can be media blasted, the undercoating needs to be removed, as the media just bounces off. It is a smelly and ugly job involving heat to soften it and then scrapers to remove it all. Spent 4 hours on it today, and will likely finish it up tomorrow. The shell is in a separate room used for messy jobs like this and sandblasting. Even though a lot of the floorpans were already replaced, there is still a a lot of undercoating to remove. It was sprayed everywhere!

Note how far the original orange overspray went. Not sure yet if we will be replicating
that or not.

May 6, 2004
Bottom of body has been media blasted, no further problems found. Imagine that!! Epoxy primer is now on. Painting of the bottom will be next week, and chassis will be ready soon after that. I chose to go with an undercoating type finish for the bottom for several reasons. I plan on driving the car, and it adds a measure of protection. It also acts as sound deadening. A coat of paint will be applied over that to make cleaning easy. Hard to get an overall shot in close quarters, but here is a section of the bottom of the car in epoxy primer. Funny how the dust and handprints make for optical illusions (looks rough and dented but very smooth).

May 29, 2004
Way behind schedule and over budget, I have decided to mate the chassis and body, and then pull the car out of the shop for 6 months or so while I regroup. There will be lots of small items I can deal with and work on that don't cost money, its the small details that make the difference in a project like this.
The bottom of the car has been painted. I chose to go with a rock underguard which
then gets painted semi-gloss black. This way the bottom is protected from rock chips
and is durable, but yet easy to clean. The bottom of the car has a slight texture
from this process, but nothing like spraying on layers of undercoating which some
people do to hide bad bodywork or corrosion. The paint continues up the firewall
and over onto the dash area. Whether or not we pull the body again to paint the car
is up in the air at this point, both procedures have advantages.
In the pictures below, the strange "dots" are caused by dust floating in
the shop reflecting off the flash of the camera. Not much I can do about that, there
are other cars being worked on. You can also see the slight texture the bottom of
the car has now. The chassis will be trucked out to the body once weather allows,
nothing but rain for the past few weeks. Looks good , eh? :-)


Sept 3, 2004
Chassis was trucked out to the shop, body lowered back onto the frame, braces removed, doors and trunklid hung and then the whole thing was trucked back to my garage. The GM mounts worked good. Alignment was done using magnetic plumb bobs over two of the nut holes into the mount hole (as opposed to GM using alignment pins). A hoist makes this process easy, you just slowly lower the body down watching for problems and alignment. Mounts were not torqued, only snugged as still have not decided whether body will be removed again for paint. This is where things will stop for a while as I am broke as far as this project is concerned. Major visual progress, though. Paint would have been better. Flash makes engine look orange, its red.

As it sits with the guidecoats sprayed on for blocksanding. The blue was sprayed last on the doors and top of trunk area where the factory seams were re-leaded (factory seams had cracks in the lead). Trunklid alignment leaves something to be desired (looks good in the pic, but the other side isn't great), but thats normal on these cars. I am not impressed though as that was supposed to be addressed while the car was at the shop. Sometimes swapping parts will help solve this. Only car I had that was perfect in this regard had the complete quarter replaced, and while the trunklid lined up excellent, the rear window didn't fit very well!! Weatherstripping also makes a difference in that it loads the hinges upwards. So we'll play a bit. I have more time than money. Lots of parts to test fit.

Close up of the #1 and #2 body mounts as installed.

Sept 15, 2004
Trunk floor as installed. Turned out very nice, some small wrinkles but the GM panels were not perfect either. Once the car is painted the inside of the trunk area will get sprayed with the correct speckle paint that GM used. Sure looks better than the huge rust hole that was in there before. What you see on the hinges is all that remains of the original paint. At the very top of the picture you can just make out where the pump mounts in the center of the rear seat support, and the two holes either side of that where the factory has 6 x 9 speaker cutouts in the vertical position (they aim into the trunk area...pretty much useless with the top down).
You can also see where the spare tire hook attaches to the trunk floor. Further forward, there should be a small support piece welded to the floor that holds the jack. Since I have no intention of using the factory jack setup, I left it off as all it does is present problems when putting things in the trunk.

Sept 21, 2004
In January of last year , we did a quick test fit of the body while at the resto shop. I wasn't particularily happy with the specs they like to use (and it was just a rough test for any major problems), so I decided I would assemble it again -myself- and see if I could get it aligned to where I would be happy. 3/16" over all panels, not 1/4". Anyway, the rad support is now mounted to the frame and will not move again. The hood, fenders, and doors will have to come off again for painting of the jambs and such but with the hinges and rad support now mounted the final positions are set. I like my door gaps smaller than some cars, it makes the car look more "quality" but also causes problems. Small variations show up easily, and opening a door with the car jacked in certain ways can scrape the paint off. But its a trade off and if you are aware of the issues the upside is a well put together car you can be proud of.
The panels were on and off many times, and we had to shift the entire body slightly so the rad support would center. One shim under each upper cowl fender bolt and everything fell into place. Still have to test fit the front bumper. Note the tape under the emblems. On these fenders, the holes were drilled for "barrel clips" on the emblems, so by placing tape over the holes and punching the emblem pins through it holds them in place to check alignment. I'll be using the proper nuts that came with my NOS emblems. At this point, I have put about 15 hours into the panel fit, and I did have friends help with the hood and shifting the body. Once the color is on and the panels are not separated by individual colors, the "flow" should be awesome...
For now, I'm pretty happy with the way it is. Its not perfect, but despite what Mr Barret Jackson might say to sell the over restored trailer queens that he gets a fair percentage of, old cars did not have perfect gaps from the factory.

April 23, 2005
Its a bit backwards but spent today cleaning the undercoating off the front wheelhouses. A propane torch, small scraper and some gloves make short work of it though. Heat the undercoating up until it just starts to turn black, then scrape it off. Do small areas and don't get carried away with the heat. You'll know when you get the heat right as it takes no effort at all to remove the coating. Hot tanking would be a better option, but doing it this way will allow it to be media blasted before painting (media won't touch undercoating). You could also use scotchbrite and varsol to do final cleaning and then paint if desired.

May 22/2005
Lots of details to take care of yet...need to get bumpers chromed, polish all the stainless, replate grille studs and little detail items like that...one step at a time. Here is a picture of the grille repainted and ready to go. There has been some debate about whether the grilles were dark arget and silver, or black and silver. The grille on my car was black for sure (the bottom parts of the horizontal bars where the sun never shines were definitely black), and had never been painted. Take your pick. I went with semi-gloss black and dull aluminum silver. Also, the masking on my grille is sharper (hard edges) than the factory which appeared to just use loose templates as there was overspray all over the place.

June 13/05
Here we go...

Oct 14, 2005
The top frame assembly on this car is a challenge. Original was partially destroyed by rust, so I had bought a replacement top assembly. It had some issues too, but luckily between the two all the parts were there to make a very good one. I wanted to replace all the bushings as well, but nobody makes them except for the piston ends. Same with the special attach bolts. Lots of shopping to find correct bushings, and some are used. The top won't get used much anyway! The side rails (and hardware) broken down and beadblasted:

Painting has been done on the side rails (THAT was nasty due to all the moving parts and hidden areas), and next they will be assembled. The cross parts including header bow have yet to be painted. And while you can't see most of these parts with the top up, once folded down the mechanism becomes visible so they need to look decent.
The GM manuals are pretty useless for this. They cover servicing and new top covers, but almost nothing on actual assembly. I have taken detailed pics and may make a page just for these tops, with diagrams of all the bushings etc. Some are bizarre as they also have a bolt threaded through them which sticks out the other side and is then used to attach more parts. Not your average NAPA type stuff. The GM parts catalog has the usual 4 x 4 inch picture of the 81 parts needed to assemble just one side!!! :-)
This picture shows the two forward side rail assemblies broken down as far as they can go (without drilling out the rivets, anyway), painted, hanging in the garage. The forward one is the drivers side, you can see the curvature for the drivers door glass. Powdercoating would have been nice but with the nylon bushings in the mechanism it is not an option. I used wire to hold the arms in position so nothing would touch as it was being painted and also for hanging the parts.

Due to the way these cars were painted, the general plan is to paint the jambs, inside of fenders, backseat and top well area first. Car will be assembled and the top parts and frame will go in; the top will be installed; and finally the exterior of the car will be painted. This avoids having a top installed with brand new paint on the car, and also allows us to to adjust the top and get it to fit/operate properly before getting covered. With base clear its pretty easy to get jambs and exterior, painted separately, to be seamless.
Nov 4/2005
Drivers side rail now painted and assembled with aft rail. I chose to leave the rough edges and "as cast' machine marks on the parts wherever possible. It might not be as pretty but it is authentic. The bushings have been replated. Attach bolts are original, still trying to source these new somewhere...GM and their oddball hardware!!! I could have them made and chromed from standard bolts but running out of time so still trying to find new ones or may replace them later.

Nov 10, 2005
Front header bow took a bit more work. These tend to rust out I've been told, mine was pretty good except for a couple tabs that had broken off the tackstrip retaining area. I made new up tabs and they were welded in. The entire inside was soaked with rust convertor for any surface rust inside and to prevent future corrosion, then the part was primed and painted. Again, the quality of the paint on this part is better than GM did it, and most of this part is unseen once top is installed. Note the factory spotwelds across the front lower edge, and the edge closest to camera.

Nov 20/05
ORANGE!!!! Car has jambs and rear seat area painted....when I first saw the color under the the interior lighting and another car on the hoist, I was underwhelmed. It looked almost copper. But once we opened the door and the natural light hit it, it was stunning. There is a gold metallic flake in it that really brings out the highlights. So much so that I can't get a really good picture, the color changes with every angle. So the best description I have heard is "coppery smokey creamy orange that shimmers to bright oranges in the light". Whatever that means. :-) It is lighter than I pictured it, although the images don't show that. It certianly isn't a normal orange like Chevy Hugger orange or any of those colors. This stuff is alive!
Please note that the masking on the upper cowls was done to keep the car sanitary. Original would have been to blast overspray across the entire top cowl area, and while correct looks like crap. Sorry to all the correct gods, I prefer it this way. Also ignore the dust.
In this picture, note how the color is different everywhere you look. I think the interior color is a good combo, we'll see about the top...
Next step is windshield header parts final install, top frame installation, then top install, then back for final assembly and paint. I must say too these pictures look a little dark on my computer...the color really needs to be seen in person.

Dec 5/05
PLAN B! Top went in, but had a problem. I had test fit this top assembly in 2001 or so, and it worked as advertised. At that time I had no interior panels and didn't really know what I was looking at so I was extremely disappointed when it was discovered that the top, upon retraction, would not fit into the "pocket" on one side. Now I have a problem as car was already booked in for top installation. I had to cancel that, and spent many hours troubleshooting, rigging, and shimming the top assembly. Finally discovered that one of the main rail brackets had a bend in it, so up was fine but down it drove the arm assembly inboard.
So now looks like the top will be the last piece installed. Parts are on the way. Car is at shop for final assembly and paint. It will come home, get assembled over the next few weeks, then hopefully there will be enough time to fit car in for top install before the Calgary World of Wheels show arrives Feb 17. If not, well that's the way it goes.
The upside is I have learned a lot about how these tops work, as all the manuals get involved in recovering the top, but almost nothing about the actual top installation and adjustment itself and info seems very scare. Most people just leave them alone I guess. I also will be able to confirm the glass and all other parts are lined up before the top goes on...once that is done you can't adjust much without getting wrinkles, etc. Downside is the top will go in with a freshly painted car and scratches will be hard to avoid.
Tape/foam on windshield header is to protect the paint from the small tabs used to hold the tackstrip to the front header bow. Once covered with fabric they're ok, but now scratch the w/s header easily. You want that part smooth as vinyl gets glued on there.

Dec 15/05
Car is painted. Wet sanding will start on the 9th. Four coats of base and four of clear. Body looks really straight, although may have lost some detail due to all the block sanding. Next is windshield, then car will come home and I will start assembling it. We are two weeks behind schedule now, and it drives me nuts dealing with other people, but hey if it doesn't make the show then no advertising for them. Their loss. Not that keen on doing a show anway. I took time off work based on what they told me to put the car together and most of that time will be wasted now. Don't make promises unless you can keep them.
Its kinda odd too how unexcited I am about all of this. It looks good and after five years of work its finally in color and usually at this point I'm jumping up and down like a little kid but I'm just numb. Not sure why. There have been lots of issues getting things done for this project and the money involved has gone way up over the years, especially for an working stiff like myself. That takes the fun out of it, I think. Once on the road I will be happier for sure.
Since the car is painted, this body page is concluded. I'm also out of webspace. The final assembly page will carry the completion of the car.

Concluded Jan 7/2006